
Kia Cee'd: Trip computer / Trip mode (A, B)
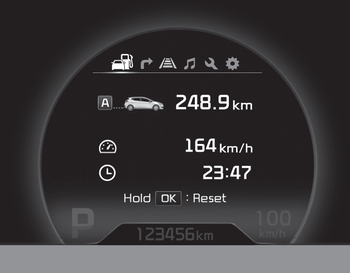
This mode indicates 3 kinds of driving Information.
All stored driving information (except odometer, distance to empty and instant fuel economy) resets if the battery is disconnected.
1. Tripmeter (km or mi.)
This mode indicates the distance of individual trips selected since the last tripmeter reset.
The meter's working range is from 0.0 to 9999.9 km (0.0 to 9999.9 miles).
Pressing the  button for more
than 1
second, clears the tripmeter to zero (0.0).
2. Average speed (km/h or MPH)
This mode calculates the average speed of the vehicle since the last average speed reset.
Even if the vehicle is not in motion, the average speed keeps going while the engine is running.
Pressing the button for more
than 1
second, when the average speed is displayed,
clears the average speed to zero
(---).
3. Elapsed time
This mode indicates the total time traveled since the last driving time reset.
Even if the vehicle is not in motion, the driving time keeps going while the engine is running.
The meter’s working range is from 0:00~99:59.
Pressing the button for more
than 1
second, when the driving time is being
displayed, clears the driving time to zero
(0:00).
 Driving information mode
This mode indicates 3 kinds of driving
Information.
All stored driving information (except
odometer, distance to empty and instant
fuel economy) resets if the battery is disconnected.
1. Dis ...
 Lane Departure Warning System
(LDWS) Mode
This mode displays the state of the Lane
Departure Warning System (LDWS).
For more details, refer to “Lane departure
warning system” in chapter 5. ...
Other information:
: General Information
WARNING: Driving while distracted
can result in loss of vehicle control, crash
and injury. We strongly recommend that
you use extreme caution when using any
device that may take your focus off the
road. Your primary responsibility is the
safe operation of your vehicle. We
recommend against th ...
Kia Cee'd JD Owners Manual: Headlight (Low, Non-HID Type)
Follow the steps 1 to 7 from the previous
page.
8. Remove the cover by turning it counterclockwise.
9. Remove the socket from the assembly
by turning the socket counterclockwise
until the tabs on the socket align with
the slots on the assembly.
10. Pull the bulb out of the socket.
11. ...
