Kia Cee'd: Fuel Delivery System / Repair procedures
| Fuel Pressure Test (Low
pressure system) |
| 1. |
Release the residual pressure in fuel line.
(Refer to Fuel Delivery System - “Release Residual Pressure in Fuel
Line”)
|
When removing the fuel pump relay, a Diagnostic Trouble Code
(DTC) may occur. Delete the code with the GDS after completion
of “Release Residual Pressure in Fuel Line” work.
|
|
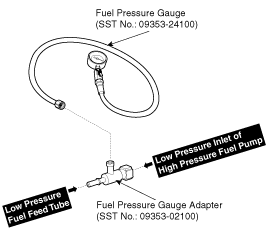
| 2. |
Install the Special Service Tool (SST).
| (1) |
Disconnect the low pressure fuel feed tube from the low pressure
inlet of high pressure fuel pump.
|
There may be some residual pressure even after “Release
Residual Pressure in Fuel Line” work, so cover the hose
connection with a shop towel to prevent residual fuel
from spilling out before disconnecting any fuel connection.
|
|
| (2) |
Install the special service tool for measuring the fuel pressure
in between the low fuel feed tube and the low pressure inlet
of high pressure fuel pump (Refer to the figure below).
|
|
| 3. |
Inspect fuel leakage on connections among the low fuel feed tube, the
low pressure inlet of high pressure fuel pump, and the SST components
with IG ON.
|
| 4. |
Measure Fuel Pressure.
| (1) |
Start the engine and measure the fuel pressure at idle.
|
Fuel Pressure:
480 ~ 520 kPa (4.89 ~ 5.30 kgf/cm², 69.6 ~ 75.4 psi)
|
|
If the fuel pressure differs from the standard value,
repair or replace the related part (Refer to the table
below).
|
Fuel
Pressure
|
Cause
|
Related Part
|
Too Low
|
Fuel filter clogged
|
Fuel Filter
|
Fuel leakage
|
Fuel Pressure Regulator
|
Too High
|
Fuel pressure regulator valve stuck
|
Fuel Pressure Regulator
|
|
| (2) |
Stop the engine, and then check for the change in the fuel pressure
gauge reading.
|
Standard Value: The gauge reading should hold for about
5 minutes after the engine stops
|
|
If the gauge reading should not be held, repair or replace
the related part (Refer to the table below).
|
Fuel Pressure
(After Engine Stops)
|
Cause
|
Related
Part
|
Fuel Pressure Drops Slowly
|
Leakage on injector
|
Injector
|
Fuel Pressure Drops Immediately
|
Check valve of fuel pump stuck open
|
Fuel Pump
|
|
| (3) |
Turn the ignition switch OFF.
|
|
| 5. |
Release the residual pressure in fuel line.
(Refer to Fuel Delivery System - “Release Residual Pressure in Fuel
Line”)
|
| 6. |
Test End
| (1) |
Remove the Special Service Tool (SST) from the low pressure
fuel feed tube and the low pressure inlet of high pressure fuel
pump.
|
| (2) |
Connect the low pressure fuel feed tube and the low pressure
inlet of high pressure fuel pump.
|
|
| Release Residual Pressure
in Fuel Line |
|
Whenever the high pressure fuel pump, fuel pipe, delivery pipe, or injector
is removed immediately after shutting off the engine, an injury may
be caused by the release of highly pressurized fuel. Release the residual
pressure in the high pressure fuel line by referring to the "Residual
fuel pressure release procedure" below before removing any high pressure
fuel system components.
|
|
Wear safety glasses and fuel resistant gloves.
|
| 1. |
Turn the ignition off and disconnect the battery negative cable.
|
| 2. |
Remove the rear seat cushion.
(Refer to Body - "Rear Seat Assembly")
|
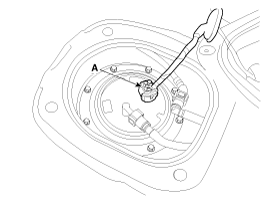
| 3. |
Remove the service cover (A) after loosening the screws (B).

|
| 4. |
Disconnect the fuel pump connector (A).
|
| 5. |
Disconnect the electrical connector from the high pressure fuel pump.
|
| 6. |
Reconnect the battery negative cable.
|
| 7. |
Run the engine for about 20 seconds to lower the pressure in both the
high or low pressurelines. The engine may shut off within the 20 second
period. If not, turn the engine off.
|
| 8. |
Proceed with the service or repair. Use rags to cover opening and catch
spills when opening up the high pressure system.
|
| 9. |
Reinstall / re-connect all components in reverse order of removal. Start
engine and confirm proper operation, and make sure there are no fuel
leaks.
|
| 10. |
After completing, clear DTC(s) using GDS scan tool (the procedure described
above will cause DTC to set).
|
Components Location
1. Fuel tank
2. Fuel pump
3. Fuel filter
4. Fuel pressure regulator
5. Canister
6. Fuel filler hose
7. Leveling hose
...
Removal
1.
Release the residual pressure in the fuel line.
(Refer to Fuel Delivery System - "Release Pressure in Fuel Line")
2. ...
Other information:
Kia Cee'd JD Service Manual: General information
Important Safety Notice
Proper service methods and repair procedures are essential for safe, reliable
operation of all motor vehicles as well as personal safety of the operator.
The service procedures and descriptions in this shop manual provide general
directions for a serv ...
Kia Cee'd JD Owners Manual: Do not lie down
To reduce the chance of injuries in the
event of an accident and to achieve maximum
effectiveness of the restraint system,
all passengers should be sitting up
and the front seats should be in an
upright position when the car is moving.
A seat belt cannot provide proper protection
if th ...


 Components and components location
 Fuel Tank Repair procedures