Kia Cee'd: Power Door Locks / Power Door Lock Actuators Repair procedures
Kia Cee'd JD Service Manual / Body Electrical System / Power Door Locks / Power Door Lock Actuators Repair procedures
| Inspection |
Front Door Lock Module Inspection
| 1. |
Remove the front door trim.
(Refer to Body - "Front Door Trim")
|
| 2. |
Remove the front door module.
(Refer to Body - "Front Door Module")
|
| 3. |
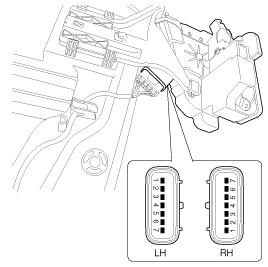
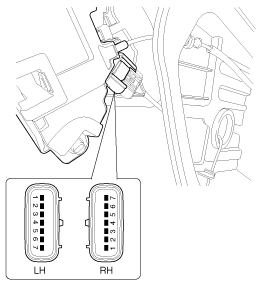
Disconnect the connector from the actuator.
|
| 4. |
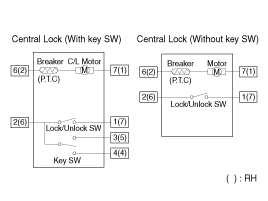
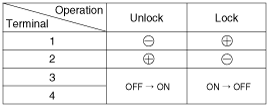
Check actuator operation by connecting power and ground according to
the table. To prevent damage to the actuator, apply battery voltage
only momentarily.
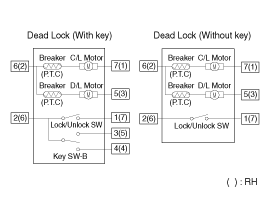
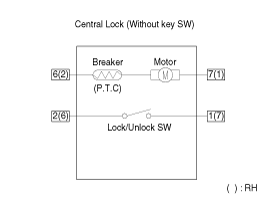
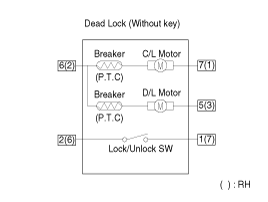
[Central Lock]
[Dead Lock]
|
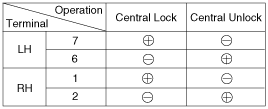
| 5. |
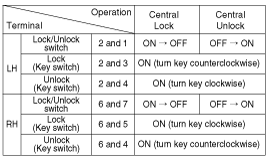
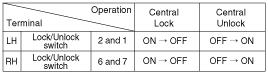
Check for continuity between the terminals in each switch position according
to the table.
[Central Lock]
|
Rear Door Lock Module Inspection
| 1. |
Remove the rear door trim.
(Refer to Body - "Rear Door Trim")
|
| 2. |
Remove the rear door module.
(Refer to Body - "Rear Door Module")
|
| 3. |
Disconnect the connector from the actuator.
|
| 4. |
Check actuator operation by connecting power and ground according to
the table. To prevent damage to the actuator, apply battery voltage
only momentarily.
[Central Lock]
[Dead Lock]
|
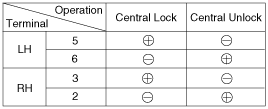
| 5. |
Check for continuity between the terminals in each switch position according
to the table.
[Central / Dead Lock]
|
Tailgate Release Module Inspection
| 1. |
Remove the tailgate trim.
(Refer to Body - "Tailgate Trim")
|
| 2. |
Disconnect the connector from the actuator.
|
| 3. |
Check actuator operation by connecting power and ground according to
the table. To prevent damage to the actuator, apply battery voltage
only momentarily.
|
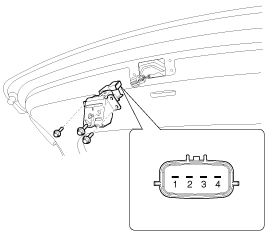
Tailgate Open Switch Inspection
| 1. |
Remove the tailgate open switch bracket (A) after loosening screws.
|

| 2. |
Remove the switch and disconnect the connector from the switch.
|
| 3. |
Check for continuity between the terminals in each switch position according
to the table.
|

 Components and components location
Component Location
1. Door lock switch
2. SJB (Smart Junction Box)
3. BCM (Body Control Module)
4. Front door lock actuator
5. Rear door lock a ...
 Power Door Lock Relay Repair procedures
Inspection
Diagnosis With GDS
1.
It will be able to diagnose defects of power door lock with GDS quickly.
GDS can operates actuator forcefully, input/output v ...
Other information:
: Cooling System Capacity and Specification - 2.0L EcoBoost™
Use coolant that meets the defined
specification.
If you do not use coolant that meets the
defined specification, it could result in:
Component damage that your vehicle
warranty does not cover.
Reduced vehicle performance.
Capacities
Materials
...
Kia Cee'd JD Service Manual: Main Crash Pad Assembly Repair procedures
Replacement
•
When prying with a flat-tip screwdriver, wrap it with protective
tape, and apply protective tape around the related parts, to
prevent damage.
...
© 2017-2026 www.kceed.com
