Kia Cee'd: Tail Gate / Tail Gate Assembly Repair procedures
Kia Cee'd JD Service Manual / Body (Interior and Exterior) / Tail Gate / Tail Gate Assembly Repair procedures
| Replacement |
|

|

| 1. |
Remove the tail gate upper trim.
(Refer to Tail Gate - "Tail Gate Trim")
|
| 2. |
Remove the tail gate trim.
(Refer to Tail Gate - "Tail Gate Trim")
|
| 3. |
Remove the tail gate side trim.
(Refer to Tail Gate - "Tail Gate Trim")
|
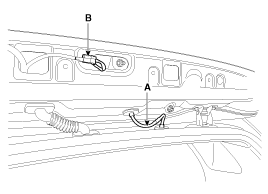
| 4. |
Disconnect the washer nozzle hose (A) and high mounted stop lamp connector
(B).
|
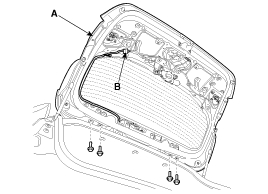
| 5. |
Disconnect the connectors and tail gate wiring harness (B).
|
| 6. |
After loosening the mounting bolts, then remove the tail gate assembly
(A).
|
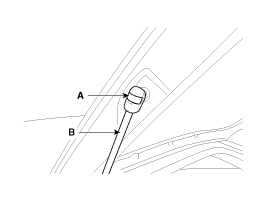
| 7. |
Using a screwdriver, lift the socket clips (A) up slightly on both ends
of the tail gate lifter (B).
|
| 8. |
Install in the reverse order of removal.
|
 Tail Gate Assembly Components and components location
Component Location
1. Tail gate assembly
...
 Tail Gate Trim Components and components location
Component Location
1. Tail gate trim
...
Other information:
Kia Cee'd JD Service Manual: Flex Steering Description and operation
Instruction
Flex Steering is system to choose the three modes power steering depending on
driver preference or driving conditions.
•
Display on the cluster but power steering is ...
Kia Cee'd JD Service Manual: Heated Steering wheel Schematic diagrams
System Circuit Diagram
Terminal Function
Housing
Pin
Function
Wire color
Pad
A
GND
Back
B
HEATER
Yellow
...
© 2017-2026 www.kceed.com
