Kia Cee'd: Engine Control System / CVVT Oil Control Valve (OCV) Repair procedures
| 1. |
Turn the ignition switch OFF.
|
| 2. |
Disconnect the OCV connector.
|
| 3. |
Measure resistance between the OCV terminals 1 and 2.
|
| 4. |
Check that the resistance is within the specification.
|
Specification: Refer to “Specification”
|
|
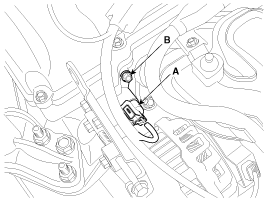
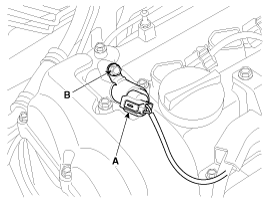
| 1. |
Turn the ignition switch OFF and disconnect the battery negative (-)
cable.
|
| 2. |
Disconnect the CVVT oil control valve connector (A).
|
| 3. |
Remove the installation bolt (B), and then remove the valve from the
engine.
[Bank 1 / Intake]
[Bank 1 / Exhaust]
|
| • |
Install the component with the specified torques.
|
| • |
Note that internal damage may occur when the component is dropped.
If the component has been dropped, inspect before installing.
|
|
| • |
Apply engine oil to the valve O-ring.
|
|
| 1. |
Installation is reverse of removal.
|
CVVT oil control valve installation bolt:
9.8 ~ 11.8 N.m (1.0 ~ 1.2 kgf.m, 7.2 ~ 8.7 lb-ft)
|
|
Description
Variable Intake manifold Solenoid (VIS) valve is installed on the intake manifold.
The VIS valve controls the vacuum modulator which activates a valve in the intake
m ...
Other information:
Kia Cee'd JD Service Manual: Heater & A/C Control Unit (DATC) Repair procedures
Self Diagnosis
1.
Self-diagnosis process
2.
How to read self-diagnostic code
After the display the panel blinks three times every 0.5 second, the
corresponding fault code blinks on the setup temperature display pan ...
: AC Charging
Connecting the Charger
To charge the high-voltage
battery:
Put the vehicle in park (P).
Press the center right edge of the
charge port door and then release to
open the door.
Plug the charging coupler into the
charge port receptacle on your vehicle.
Make sure the button clicks confirmi ...

 CVVT Oil Control Valve (OCV) Schematic diagrams
 Variable Intake Solenoid (VIS) Valve Description and operation