
Kia Cee'd: Manual Transaxle Control System / Control Shaft Complete Repair procedures
Kia Cee'd JD Service Manual / Manual Transaxle System / Manual Transaxle Control System / Control Shaft Complete Repair procedures
| Removal |
| 1. |
Move the shift lever to neutral gear position.
|
| 2. |
Remove the air cleaner assembly.
(Refer to Engine Mechanical System - "Air Cleaner")
|
| 3. |
Remove the battery and battery tray.
(Refer to Engine Electrical System - "Battery")
|
| 4. |
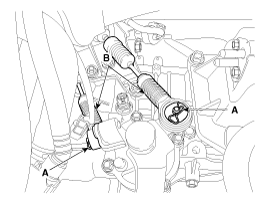
Remove the control cable (B) from the control shaft after removing the
pins (A).
|
| 5. |
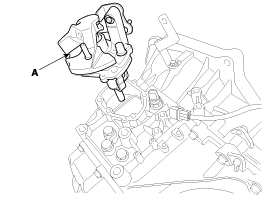
Remove the control shaft complete (A).
|
| Installation |
| 1. |
Install in the reverse order of removal.
|
|

 Control Shaft Complete Components and components location
Components Location
1. Control Shaft Complete ...

Other information:
Kia Cee'd JD Service Manual: Components and components location
Components
1. Receiver
2. TPMS Sensor
3. TPMS Sensor
4. TPMS Sensor
5. TPMS Sensor
...
Kia Cee'd JD Owners Manual: Manual transaxle shift indicator
This indicator informs you which gear is
desired while driving to save fuel.
For example
: Indicates that shifting up to
the 3rd
gear is desired (currently the shift
lever is in the 2nd or 1st gear).
: Indicates that shifting down to
the
3rd gear is desired (currently the
shift l ...
© 2017-2026 www.kceed.com
