
Kia Cee'd: Lighting System / Room Lamp Repair procedures
Kia Cee'd JD Service Manual / Body Electrical System / Lighting System / Room Lamp Repair procedures
| Inspection |
Room Lamp
| 1. |
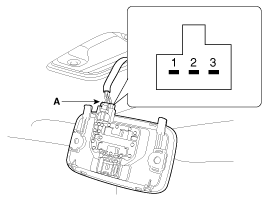
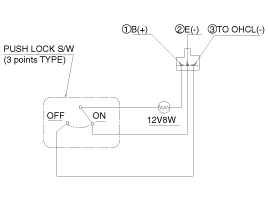
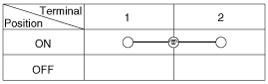
Check that the switch operates properly after disconnecting the room
lamp connector (A).
|
| Removal |
Room Lamp
| 1. |
Disconnect the negative(-) battery terminal.
|
| 2. |
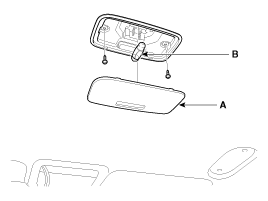
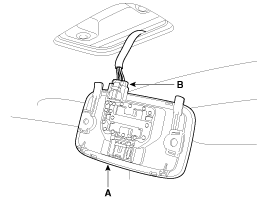
Carefully remove the lamp lens (A) from the room lamp with a flat-tip
screwdriver.
|
| 3. |
Replace the bulbs (B) and remove the screws if it is necessary.
|
| 4. |
Remove the room lamp assembly (A) after disconnecting the connector
(B).
|
Vanity Lamp
| 1. |
Disconnect the negative (-) battery terminal.
|
| 2. |
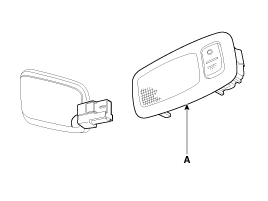
Remove the vanity lamp (A) by pressing the clip with a small screwdriver.
|
| 3. |
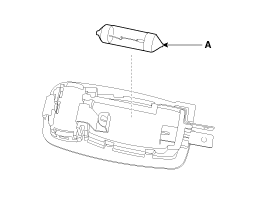
Remove the vanity lamp bulb (A) assembly after disconnecting the connector.
|
| Installation |
Room Lamp
| 1. |
Reconnect the connector.
|
| 2. |
Install the room lamp assembly.
|
| 3. |
Install the lens.
|
Vanity Lamp
| 1. |
Reconnect the vanity lamp connector.
|
| 2. |
Install the vanity lamp.
|
 Head Lamps Repair procedures
Inspection
1.
Check-points upon head lamp failure (HID)
(1)
Check the battery voltage. (Low beam will be on when the battery
v ...
 Overhead Console Lamp Repair procedures
Inspection
1.
Remove the overhead console lamp assembly then check for continuity
between terminals. If the continuity is not as specified, replace the
map l ...
Other information:
Kia Cee'd JD Service Manual: Side Airbag (SAB) Module Description and operation
Description
The Side Airbags (SAB) are installed inside the front seat and protects the
driver and passenger from danger when side crash occurs. The SRSCM determines
deployment of side airbag by using Side Impact Sensor (SIS) signal.
...
Kia Cee'd JD Service Manual: Components and components location
Component Location
1. EMS box assembly
2. Cooling fan(Low) relay
3. Cooling fan(High) relay
4. ESS relay
5. Blower relay
6. Rear defogger relay
7. HAC relay
8. SSB4(IG2) relay
9. Front wiper relay
10. SSB3(IG1) relay
...
© 2017-2026 www.kceed.com
