Kia Cee'd: Floor Carpet / Repair procedures
| Replacement |
|

|

| 1. |
Remove the front seat assembly.
(Refer to Front Seat - "Front Seat Assembly")
|
| 2. |
Remove the rear seat assembly.
(Refer to Rear Seat - "Rear Seat Assembly")
|
| 3. |
Remove the floor console assembly.
(Refer to Floor Console - "Floor Console Assembly")
|
| 4. |
Remove the cowl side trim.
(Refer to Interior Trim - "Cowl Side Trim")
|
| 5. |
Remove the center pillar lower trim.
(Refer to Interior Trim - "Center Pillar Trim")
|
| 6. |
Remove the luggage side trim.
(Refer to Interior Trim - "Luggage Side Trim")
|
| 7. |
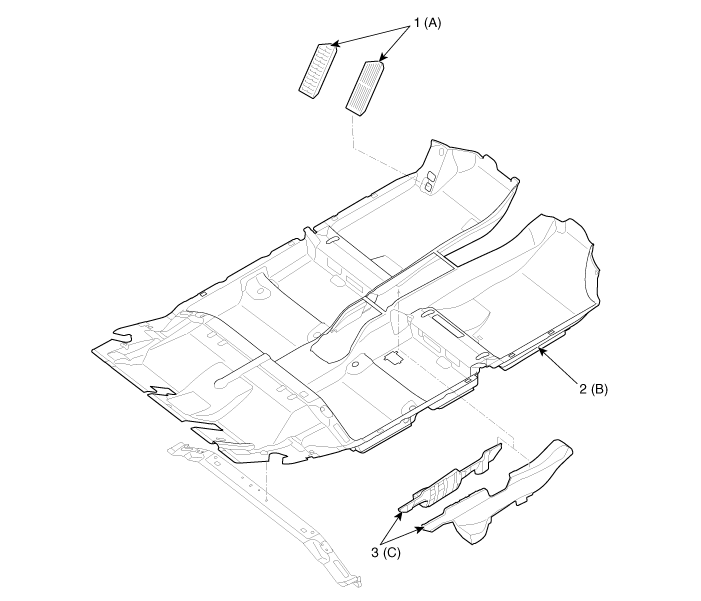
Remove the foot rest (A).
|
| 8. |
Remove the floor carpet assembly (B).
|
| 9. |
Remove the tunnel pad (C).
|
| 10. |
Install in the reverse order of removal.
|

 Floor Carpet
...
 Front Bumper
...
Other information:
Kia Cee'd JD Service Manual: Repair procedures
Adjustment
Glass Adjustment
•
Check the glass run channel for damage or deterioration, and
replace them if necessary.
1.
Remove ...
: How Does Driver Alert Work. Driver Alert Precautions. Driver Alert Limitations
How Does Driver Alert Work
Driver Alert calculates your alertness level
based on your driving behavior in relation
to the lane markings and other factors
through use of the front camera sensor
behind the interior mirror.
Driver Alert Precautions
WARNING: You are responsible for
controlling you ...
© 2017-2026 www.kceed.com
