Kia Cee'd: Smart Key System / Smart Key Unit Components and components location
Kia Cee'd JD Service Manual / Body Electrical System / Smart Key System / Smart Key Unit Components and components location
| Component |
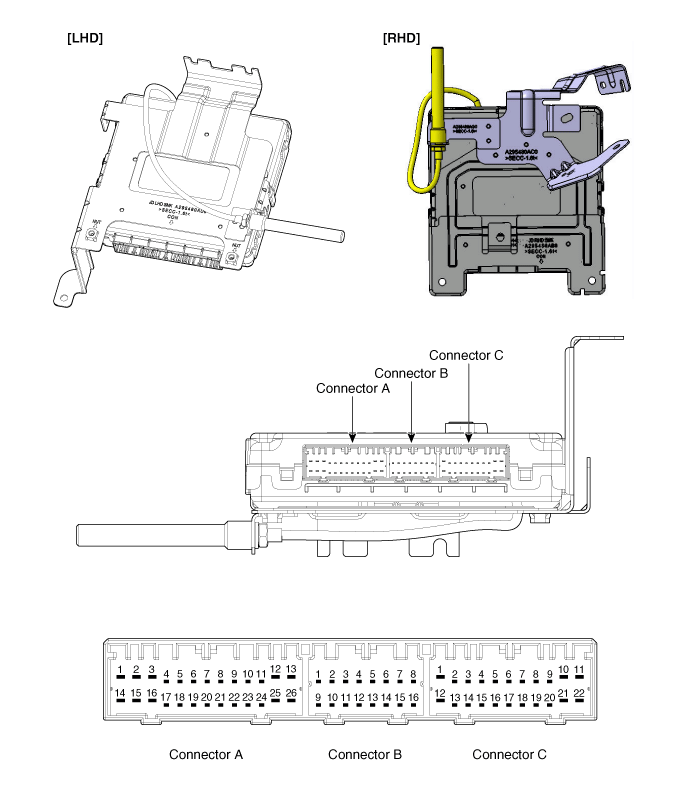
Connector Pin Information
|
No. |
Connector A(26 pins) |
No. |
Connector B(16 pins) |
No. |
Connector C(22 pins) |
|
1 |
Battery power load |
1 |
CAN H |
1 |
Start/Stop button switch illumination ground |
|
2 |
ESCL ground |
2 |
CAN L |
2 |
Immobilizer indicator |
|
3 |
Power ground1 |
3 |
- |
3 |
SSB LED OFF |
|
4 |
Ignition1 |
4 |
Stop lamp fuse |
4 |
Interior antenna #2 power |
|
5 |
Ignition1 relay |
5 |
Brake switch |
5 |
Interior antenna #1 power |
|
6 |
ACC |
6 |
Immobilizer antenna power |
6 |
- |
|
7 |
Ignition2 |
7 |
ESCL enable |
7 |
- |
|
8 |
SSB switch2 |
8 |
Wheel speed |
8 |
Trunk/Tailgate antenna power |
|
9 |
- |
9 |
Driver toggle button |
9 |
Bumper antenna power |
|
10 |
- |
10 |
ESCL unlock |
10 |
RH side antenna power |
|
11 |
ESCL COM |
11 |
External buzzer |
11 |
LH side antenna power |
|
12 |
CAN H |
12 |
P position/ Clutch switch |
12 |
SSB LED blue/ Ignition |
|
13 |
CAN L |
13 |
Start feedback |
13 |
SSB illumination power |
|
14 |
Battery voltage CPU |
14 |
Immobilizer antenna ground |
14 |
Keyout indicator |
|
15 |
ESCL battery |
15 |
Diagnostic - K |
15 |
Interior antenna #2 ground |
|
16 |
Power ground2 |
16 |
SSB LED amber/ ACC |
16 |
Interior antenna #1 ground |
|
17 |
Starter relay |
|
17 |
- |
|
|
18 |
Ignition2 relay |
18 |
- |
||
|
19 |
ACC relay |
19 |
Trunk/Tailgate antenna ground |
||
|
20 |
- |
20 |
Bumper antenna ground |
||
|
21 |
- |
21 |
RH side antenna ground |
||
|
22 |
- |
22 |
LH side antenna ground |
||
|
23 |
RPM |
|
|||
|
24 |
EMS COM |
||||
|
25 |
SSB switch1 |
||||
|
26 |
Assistant toggle button |
||||
 Smart Key Repair procedures
Smart Key
Smart Key Code Saving
1.
Connect the DLC cable of GDS to the data link connector in driver side
crash pad lower panel, turn the power on GDS.
...
 Smart Key Unit Schematic diagrams
Circuit Diagram
...
Other information:
Kia Cee'd JD Service Manual: Power Window Switch Repair procedures
Inspection
Power Window Main Switch Inspection
1.
Disconnect the negative (-) battery terminal.
2.
Remove the front door trim.
(Refer to Body - "Front Door Trim")
3.
Disconnect the c ...
Kia Cee'd JD Owners Manual: Inner fuse panel
Inside the fuse/relay panel covers, you
can find the fuse/relay label describing
fuse/relay name and capacity.
✽ NOTICE
Not all fuse panel descriptions in this
manual may be applicable to your vehicle.
It is accurate at the time of printing.
When you inspect the fuse panel in your
...
© 2017-2026 www.kceed.com
