Kia Cee'd: Rear Suspension System / Rear Upper Arm Repair procedures
Kia Cee'd JD Service Manual / Suspension System / Rear Suspension System / Rear Upper Arm Repair procedures
| Replacement |
| 1. |
Loosen the wheel nuts slightly.
Raise the vehicle, and make sure it is securely supported.
|
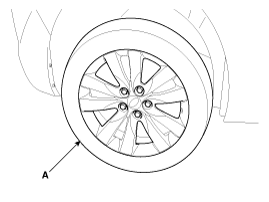
| 2. |
Remove the rear wheel and tire (A) from rear hub.
|

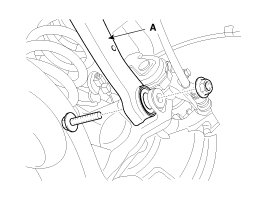
| 3. |
Loosen the bolt & nut and then remove the rear upper arm (A) from the
rear axle.
|
| 4. |
Loosen the bolt & nut and then remove the rear upper arm (A) from the
sub frame.
|

| 5. |
Install in the reverse order of removal.
|
| 6. |
Check the wheel alignment.
|
| Inspection |
| 1. |
Check the bushing for wear and deterioration.
|
| 2. |
Check the rear lower arm for deformation.
|
| 3. |
Check the coil spring and spring pad for deterioration and deformation.
|
| 4. |
Check for all bolts and nut.
|
 Rear Shock Absorber Repair procedures
Replacement
1.
Loosen the wheel nuts slightly.Raise the vehicle, and make sure it is
securely supported.
2.
Remove the rear wheel a ...
 Rear Lower Arm Repair procedures
Replacement
1.
Loosen the wheel nuts slightly.
Raise the vehicle, and make sure it is securely supported.
2.
Remove the rear wh ...
Other information:
Kia Cee'd JD Service Manual: Front Door Inside Handle Repair procedures
Replacement
1.
Remove the front door trim.
(Refer to Front Door - "Front Door Trim")
2.
After loosening the mounting screws, then remove the front door inside
handle (A).
3.
...
Kia Cee'd JD Service Manual: Description and operation
System Overview
RPAS(Rear Parking Assist System) is an electronic driving aid device warning
driver to be cautious when they park or speed low after detecting an object
on side and behind of vehicle by using the feature of ultrasonic waves.
RPAS consists of four RPS senso ...
© 2017-2026 www.kceed.com
