Kia Cee'd: Blower / Power Mosfet (DATC) Repair procedures
Kia Cee'd JD Service Manual / Heating,Ventilation, Air Conditioning / Blower / Power Mosfet (DATC) Repair procedures
| Inspection |
| 1. |
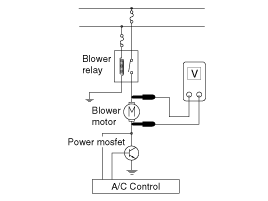
Turn the ignition switch ON.
|
| 2. |
Manually operate the control switch and measure the voltage of the blower
motor.
|
| 3. |
Select the control switch to raise the voltage until high speed.
Specification
* MANUAL FAN SPEED : (3.4V ~ B+)
* AUTO FAN SPEED : (4.0V ~ B+)
|
|||||||||||||||||||||||||||||
| 4. |
If the measured voltage is not within specification, substitute with
a known-good power mosfet and check for proper operation.
|
| 5. |
If the problem is corrected, replace the power mosfet.
|
| Replacement |
| 1. |
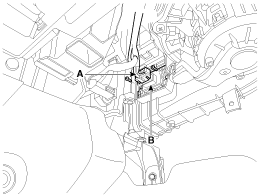
Disconnect the negative (-) battery terminal.
|
| 2. |
Disconnect the connector (A) and then remove the power mosfet (B) after
loosening the mounting screws.
|
| 3. |
Install in the reverse order of removal.
|
 Blower Resistor (Manual) Repair procedures
Inspection
1.
Measure the resistance between the terminals.
2.
If the measured resistance is not within specification, the blower resist ...
 Climate Control Air Filter Description and operation
Description
The climate control air filter is located in the blower unit. It eliminates
foreign materials and odor. The particle filter performs a role as an odor filter
as well ...
Other information:
Kia Cee'd JD Service Manual: Starter Specifications
Specification
Starter [Non-ISG type]
Item
Specification
Rated voltage
12 V, 1.2 kW
The number of pinion teeth
10
Performance
[No-load, 11 V]
Ampere
...
: Wipers and Washers – Troubleshooting
Wipers and Washers – Warning Lamps
Illuminates when the windshield
washer fluid is low.
Wipers and Washers – Frequently Asked Questions
Why are there streaks and smears on
the windshield?
The wiper blades could be dirty, worn
or damaged. Check the wiper blades. If the wiper blades are dirty, ...
© 2017-2026 www.kceed.com


