Kia Cee'd: Troubleshooting / Photo Sensor Repair procedures
Kia Cee'd JD Service Manual / Heating,Ventilation, Air Conditioning / Troubleshooting / Photo Sensor Repair procedures
| Inspection |
| 1. |
Turn the ignition switch ON.
|
| 2. |
Connect the GDS.
|
| 3. |
Emit intensive light toward the photo sensor using a lamp, and check
the output voltage change.
|
| 4. |
The voltage will rise with higher intensive light and reduce with lower
intensive light.
|
| Replacement |
| 1. |
Disconnect the negative (-) battery terminal.
|
| 2. |
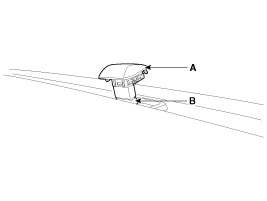
With a flat-head screwdriver, remove the photo sensor (A) from the center
of the defrost nozzle after disconnecting the connector (B).
|
| 3. |
Install in the reverse order of removal.
|
 Photo Sensor Description and operation
Description
The photo sensor is located at the center of the defrost nozzles.
The photo sensor contains a photovoltaic (sensitive to sunlight) diode. The
solar radiation recei ...
 Ambient Temperature Sensor Description and operation
Description
The ambient temperature sensor is located at the front of the condenser and
detects ambient air temperature. It is a negative type thermistor; resistance
will increas ...
Other information:
Kia Cee'd JD Service Manual: Panoramaroof Assembly Components and components location
Component Location
1. Panoramaroof assembly
...
Kia Cee'd JD Service Manual: Troubleshooting
Troubleshooting
Symptom
Suspect area
Engine will not start or struggle to start
Vapor hose damaged or disconnected
Engine struggles to start
Malfunction of the Purge Control Solenoid Valve
...
© 2017-2026 www.kceed.com
