Kia Cee'd: Lighting System / Head Lamps Description and operation
| Description and Operation |
| 1. |
Bulb
| (1) |
Elements
Xenon gas: Xenon gas activates the initial reaction for rapid
illuminating.
Molybdenum electrode: anode arcing
Metal halide salts: color composing component
|
| (2) |
Lightening principle
When Xenon gas and metal halide salt will discharge the molybdenum
anode in a capsule, it emits light.
|
|
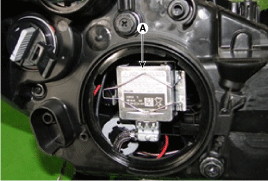
| 2. |
Ignitor
Ignitor (A) is an electromagnetic transformer that receives current
from ballast and boost voltage to light on the arc light source in any
environment.
|
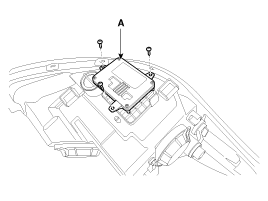
| 3. |
Ballast
| (1) |
Ballast (A) delivers an instant high voltage pulse to the ignitor
electrode, to initialize discharge in the source.
|
| (2) |
Ballast supplies the stable power to the bulb and the ignitor
during initialization and normal state of arc.
|
|
| 4. |
Stability
| (1) |
Durable for vibration as there is no filament.
|
| (2) |
Does not operate if polarity are changed.
|
| (3) |
Doesn't operate if the input voltage is not in the range of
10-16V.
|
| (4) |
Doesn't operate if the circuit is short.
|
| (5) |
Doesn't operate if the bulb burnt out.
|
|
Component
1. Head lamp assembly lens &
housing
2. Head lamp low beam bulb
3. Turn signal lamp bulb
4. Position lamp bulb
5. Head lamp high ...
Inspection
1.
Check-points upon head lamp failure (HID)
(1)
Check the battery voltage. (Low beam will be on when the battery
v ...
 Head Lamps Components and components location
 Head Lamps Repair procedures