Kia Cee'd: Troubleshooting / Evaporator Temperature Sensor Repair procedures
| Inspection |
| 1. |
Turn the ignition switch OFF.
|
| 2. |
Disconnect the evaporator temperature sensor connector.
|
| 3. |
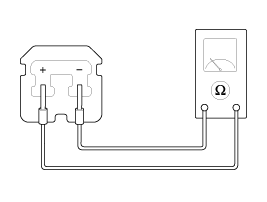
Measure resistance between terminal “+” and “-” of the evaporator temperature
sensor.
|
| 4. |
Connect the evaporator temperature sensor connector.
|
| 5. |
Run the engine and turn the A/C switch ON, then measure the voltage
between the terminals of the harness connector.
Specification
|
| Replacement |
| 1. |
Disconnect the negative (-) battery terminal.
|
| 2. |
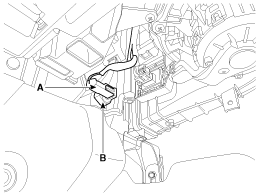
Disconnect the evaporator temperature sensor connector (A).
|
| 3. |
Remove the evaporator temperature sensor (B) by pulling it out after
rotating it 90° in a counterclockwise direction.
|
| 4. |
Install in the reverse order of removal.
|
 Evaporator Temperature Sensor Description and operation
Description
The evaporator temperature sensor will detect the evaporator core temperature
and interrupt compressor relay power in order to prevent evaporator from freezing
by exc ...
 In car sensor (DATC only) Description and operation
Description
The In-car air temperature sensor is built in the heater & A/C control unit.
The sensor contains a thermistor which measures the temperature of the inside.
The ...
Other information:
Ford Escape 2020-2026 Owners Manual: Repairing Minor Paint Damage. Waxing Your Vehicle
Repairing Minor Paint Damage
Authorized dealers have touch-up paint to
match your vehicle’s color. Your vehicle
color code is printed on a sticker on the
front, left-hand side door jamb. Take your
color code to your authorized dealer to
make sure you get the correct color.
Before repairing mi ...
Ford Escape 2020-2026 Owners Manual: What Is the Tire Pressure Monitoring System. Tire Pressure Monitoring System Overview
What Is the Tire Pressure Monitoring System
The tire pressure monitoring
system measures the vehicle's
tire pressures. A warning lamp
illuminates if one or more tires are
significantly underinflated or if there is a
system malfunction.
Tire Pressure Monitoring System Overview
WARNING: If the t ...


