Kia Cee'd: Crash Pad / Crash Pad Lower Panel Repair procedures
| • |
When prying with a flat-tip screwdriver, wrap it with protective
tape, and apply protective tape around the related parts, to
prevent damage.
|
| • |
Put on gloves to protect your hands.
|
|
| • |
Take care not to scratch the body surface.
|
|
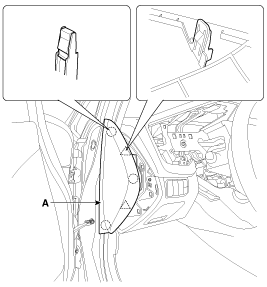
| 1. |
Using a screwdriver or remover, remove the crash pad side cover [LH]
(A).

|
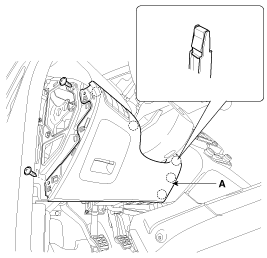
| 2. |
After loosening the mounting screws, then remove the crash pad lower
panel (A).

|
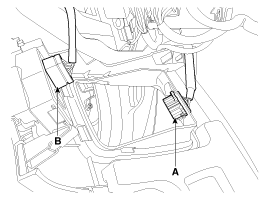
| 3. |
Disconnect the diagnosis connector (A) and crash pad lower switch connector
(B).

|
| 4. |
Install in the reverse order of removal.
| •
|
Make sure the connector are connected in properly.
|
| •
|
Replace any damaged clips.
|
|
|
Replacement
•
When prying with a flat-tip screwdriver, wrap it with protective
...
Component Location
1. Glove box housing
...
Other information:
Kia Cee'd JD Owners Manual: Opening the fuel filler lid
1. To open the lid, press the center edge
of the lid when all doors are unlocked.
✽ NOTICE
The lid will open and close only when all
doors are unlocked.
2. Fully open the lid (1).
3. To open the cap, turn it counterclockwise
(2).
4. Refuel as needed.
✽ NOTICE
If the fuel-filler ...
Kia Cee'd JD Service Manual: Special service tools
Special Service Tools
Tool Name / Number
Illustration
Description
Engine support fixture (bar)
09200-3N000
Used for holding engine assembly when removing / installing transaxle
Used ...
 Crash Pad Lower Panel Repair procedures
 Glove Box Housing Components and components location


