Kia Cee'd: Manual Transaxle Control System / Control Cable Repair procedures
Kia Cee'd JD Service Manual / Manual Transaxle System / Manual Transaxle Control System / Control Cable Repair procedures
| Removal |
| 1. |
Move the shift lever to 4th gear.
|
| 2. |
Remove the air duct and the air cleaner assembly.
(Refer to Engine Mechanical System - "Air Cleaner")
|
| 3. |
Remove the battery and battery tray.
(Refer to Engine Electrical System - "Battery")
|
| 4. |
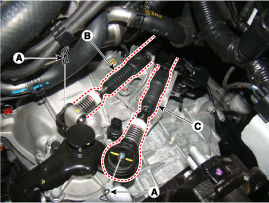
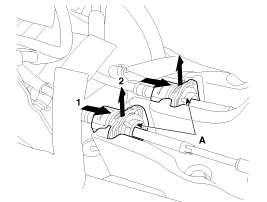
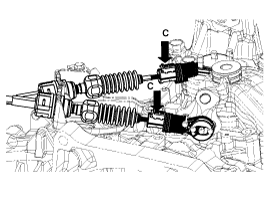
Remove the control cable.
|
| 5. |
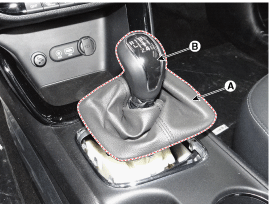
Remove the gear boots (A) and then remove the shift lever knob (B) by
rotating counter-clockwise.
|
| 6. |
Remove the floor console assembly.
(Refer to Body - " Floor Console")
|
| 7. |
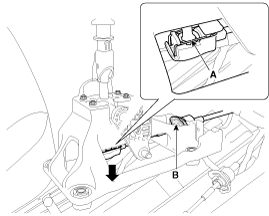
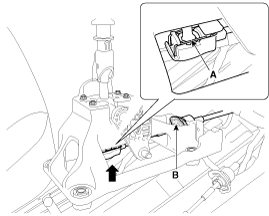
Remove the select cable (A) from the shift lever after removing the
snap pin.
|
| 8. |
Remove the shift cable (B) after removing the clip (A).
|
| 9. |
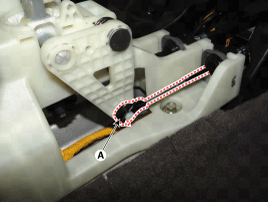
Remove the cable sockets (A) from the shift lever.
|
| 10. |
Remove the crash pad and cowl cross bar.
(Refer to Body - "Cowl Cross Bar Assembly")
|
| 11. |
Remove the heater unit.
(Refer to Heating,Ventilation, Air Conditioning - "Heater Unit")
|
| 12. |
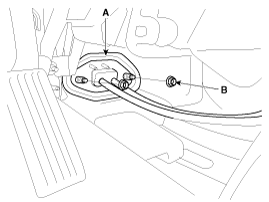
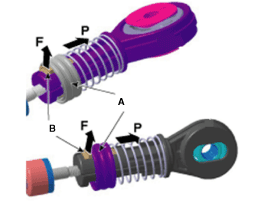
Remove the retainer (A) after loosen the nut (B).
|
| 13. |
Remove the control cable into the cabin room side.
|
| Installation |
| 1. |
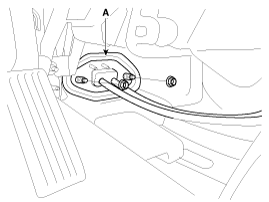
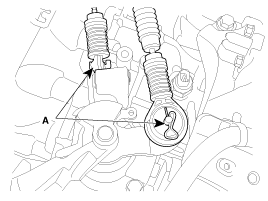
Install the cable retainer (A).
|
| 2. |
Install the heater unit.
(Refer to Heating,Ventilation, Air Conditioning - "Heater Unit")
|
| 3. |
Install the crash pad and cowl cross bar.
(Refer to Body - "Cowl Cross Bar Assembly")
|
| 4. |
Install the control cable soket (A).
|
| 5. |
Install the shift cable ( B) to the shift lever after intalling the
snap pin (A).
|
| 6. |
Insert the snap pin after installing the select cable (A) to the shift
lever.
|
| 7. |
Install the floor console assembly.
(Refer to Body - "Floor Console")
|
| 8. |
Install the boots (A) to the console after Installing the knob (B) by
rotating clockwise.
|
| 9. |
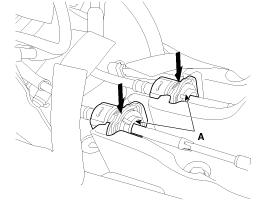
Install the control cable.
|
| 10. |
Install the battery and battery tray.
(Refer to Engine Electrical System - "Battery")
|
| 11. |
Install the air cleaner assembly.
(Refer to Engine Mechanical System - "Air Cleaner")
|
 Control Cable Components and components location
Components
1. Knob & Boots
2. Shift lever assembly
3. Shift cable
4. Select cable
5. Control cable retainer
...
 Control Shaft Complete Components and components location
Components Location
1. Control Shaft Complete ...
Other information:
Kia Cee'd JD Service Manual: Auto Light Sensor Repair procedures
Inspection
In the state of IGN1 ON, when multifunction switch module detects auto light
switch on, tail lamp relay output and head lamp low relay output are controlled
according to auto light sensor's input.
The auto light control doesn't work if the pin sunlight s ...
Kia Cee'd JD Owners Manual: Seat
Driver’s seat
(1) Seat adjustment, forward/backward
(2) Seatback recliner
(3) Seat adjustment, height
(4) Lumber support*
(5) Seat warmer*
(6) Headrest adjustment
(7) Walk-in seat
(for 3 door vehicle only)
Front passenger seat
(8) Seat adjustment, forward/backward
(9) Seatback reclin ...
© 2017-2026 www.kceed.com


