Kia Cee'd: AVN System / AVN Head Unit Repair procedures
AVN Head Unit
| • |
Take care not to scratch the center fascia panel and related
parts.
|
| • |
Ejact all the disc before removing the AVN head unit to prevent
damaging the CD player's load mechanism.
|
|
| • |
When prying with a flat-tip screwdriver, wrap it with protective
tape, and apply protective tape around the related parts, to
prevent damage.
|
| • |
Take care not to scratch the body surface.
|
| • |
Put on gloves to protect your hands.
|
|
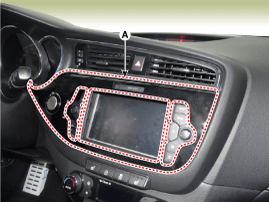
| 1. |
Disconnect the negative (-) battery terminal.
|
| 2. |
Using a screwdriver or remover, remove the center fascia panel (A).
|
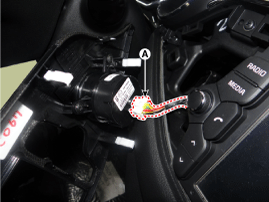
| 3. |
Disconnect the start/stop button connector (A).
|
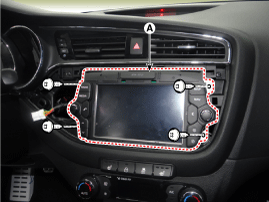
| 4. |
Remove the ANV head unit (A) after loosening 4 screws.
|
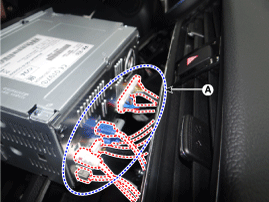
| 5. |
Remove the AVN head unit connectors and cables (A).
| –
|
If CD does not eject, don't try to remove it.
|
| –
|
The player may be damaged.
|
| –
|
Therefore, contact a service shop for repairs.
|
|
|
| 1. |
Connect the AVN head unit connectors and cables.
|
| 2. |
Install the AVN head unit.
|
| 3. |
Install the center fascia panel.
|
| 4. |
Connect the negative (-) battery terminal.
|
Make sure the AVN Head unit connectors are plugged in properly
and the antenna cable is connected properly.
|
|
Components
Connector Pin Information
No.
Connector A
Connector B
Connector C
1
Rear left spe ...
Other information:
: How Does the Lane Keeping System Work. Lane Keeping System Precautions. Lane Keeping System Limitations
How Does the Lane Keeping System Work
The lane keeping system uses a forward
looking camera mounted on the windshield
to monitor vehicle movement within the
travel lane.
When the camera detects a drift out of the
travel lane, the lane keeping system alerts
the driver by vibrating the steering w ...
: Radio Transceiver Module
Argentina
Djibouti
Ghana
Indonesia
Jamaica
Mauritania
Moldova
Morocco
Pakistan
Paraguay
NR: 2016-9-I-00244
Serbia
South Africa
South Korea
KCC-REM-DDG-FO3
Syria
Taiwan, China
Ukraine
United Arab Emirates (U.A.E.)
United States and Canada
FCC ID: L2C0062TR
This device complies with ...


 AVN Head Unit Components and components location
 Roof Antenna Components and components location