
Kia Cee'd: Timing System / Timing Chain Cover Repair procedures
Kia Cee'd JD Service Manual / Engine Mechanical System / Timing System / Timing Chain Cover Repair procedures
| Removal |
|

Mark all wiring and hoses to avoid misconnection.
|

In case of removing the high pressure fuel pump, high pressure fuel
pipe, delivery pipe, and injector, there may be injury caused by leakage
of the high pressure fuel. So don’t do any repair work right after engine
stops.
|

| 1. |
Remove the drive belt.
(Refer to Timing System - "Drive Belt")
|
| 2. |
Remove the drive belt idler.
(Refer to Timing System - "Idler")
|
| 3. |
Remove the alternetor.
(Refer to Engine Electrical System - "Alternator")
|
| 4. |
Remove the alternetor bracket.
(Refer to Engine Electrical System - "Alternator")
|
| 5. |
Remove the engineroom under cover.
|
| 6. |
Remove the crankshaft damper pulley.
(Refer to Timing System - Crankshaft Damper Pulley")
|
| 7. |
Remove the water pump.
(Refer to Cooling System - "Water Pump")
|
| 8. |
Remove the air cleaner assembly.
(Intake and Exhaust System - "Air Cleaner")
|
| 9. |
Remove the high pressure fuel pump.
(Refer to Fuel System - "High Pressure Fuel Pump")
|
| 10. |
Remove the cylinder head cover.
(Refer to Cylinder Head Assembly - "Cylinder Head Cover")
|
| 11. |
Remove the engine mounting support bracket.
(Refer to Engine And Transmission Assembly - "Engine Mounting")
|
| 12. |
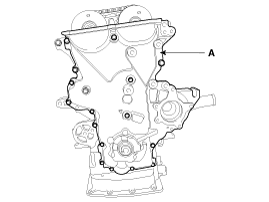
Remove the timing chain cover(A).
|
| Installation |
| 1. |
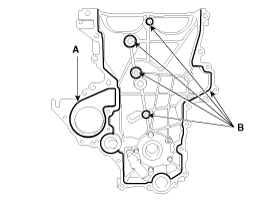
Install the timing chain cover.
|
| 2. |
Installation is reverse order of removal.
|
 Timing Chain Cover Components and components location
Components
1. Timing chain cover
...
 Timing Chain Components and components location
Components
1.
Timing chain
2. Timing chain guide
3.
Timing chain arm
4. Timing chain auto tensioner
...
Other information:
Kia Cee'd JD Service Manual: Components and components location
Components (1)
[5Door]
1. Front pillar trim
2. Cowl side trim [LH]
3. Cowl side trim [RH]
4. Center pillar upper trim
5. Center pillar lower trim
6. Rear wheel house trim
7. Rear pillar trim
8. Front door scuff trim
9 ...
Kia Cee'd JD Owners Manual: Adaptive Front Lighting System
(AFLS)
Adaptive front lighting system uses the
steering angle and vehicle speed, to
keep your field of vision wide by swiveling
and leveling the headlamp.
Change the switch to the AUTO position
when the engine is running. The adaptive
front lighting system will operate when
the headlamp is O ...
© 2017-2026 www.kceed.com
