
Kia Cee'd: Rear Suspension System / Rear Lower Arm Repair procedures
Kia Cee'd JD Service Manual / Suspension System / Rear Suspension System / Rear Lower Arm Repair procedures
| Replacement |
| 1. |
Loosen the wheel nuts slightly.
Raise the vehicle, and make sure it is securely supported.
|
| 2. |
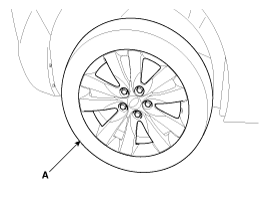
Remove the rear wheel and tire (A) from rear hub.
|

| 3. |
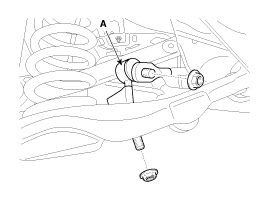
Loosen the nut and then remove the rear stabilizer link (A) from the
rear lower arm.
|
| 4. |
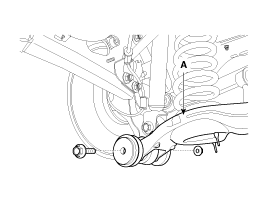
Loosen the bolt & nut and then remove the rear lower arm (A) from the
rear axle.
|
| 5. |
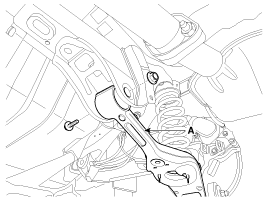
Loosen the bolt & nut and then remove the rear lower arm (A) from the
sub frame.
|
| 6. |
Install in the reverse order of removal.
|
| 7. |
Check the wheel alignment.
|
| Inspection |
| 1. |
Check the bushing for wear and deterioration.
|
| 2. |
Check the rear lower arm for deformation.
|
| 3. |
Check the coil spring and spring pad for deterioration and deformation.
|
| 4. |
Check for all bolts and nut.
|
 Rear Upper Arm Repair procedures
Replacement
1.
Loosen the wheel nuts slightly.
Raise the vehicle, and make sure it is securely supported.
2.
Remove the rear wh ...
 Rear Stabilizer Bar Repair procedures
Replacement
1.
Loosen the wheel nuts slightly.
Raise the vehicle, and make sure it is securely supported.
2.
Remove the rear wh ...
Other information:
Kia Cee'd JD Owners Manual: Recommended lubricants and capacities
To help achieve proper engine and powertrain performance and durability, use
only lubricants of the proper quality. The correct
lubricants also help promote engine efficiency that results in improved fuel
economy.
These lubricants and fluids are recommended for use in your vehicle.
Rec ...
: Instrument Cluster Indicators
Indicators notify you of various features
that are active on your vehicle.
Adaptive Cruise Control.
Automatic High Beam Control.
Auto Hold
Auto-Start-Stop
Blind Spot Monitor
Cruise Control
EV Charge
EV Later
EV Now
Front Airbag
Front Fog Lamps
High Beam
Lamps On
Ready to Drive
St ...
© 2017-2026 www.kceed.com
