Kia Cee'd: Intake And Exhaust System / Intake Manifold Repair procedures
Kia Cee'd JD Service Manual / Engine Mechanical System / Intake And Exhaust System / Intake Manifold Repair procedures
| Removal and Installation |
| 1. |
Remove the engine cover.
|
| 2. |
Disconnect the battery negative terminal.
|
| 3. |
Remove the air cleaner assembly.
(Refer to Intake And Exhaust System-"Air Cleaner")
|
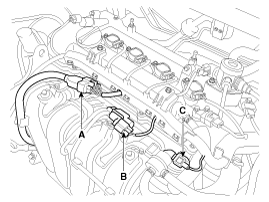
| 4. |
Disconnect the injector extension connector (A), the VIS (Variable intake
system) connector (B) and the PCSV (Purge control solenoid valve) connector
(C).
|
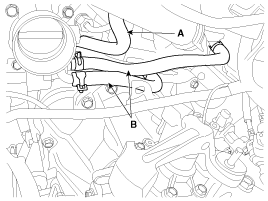
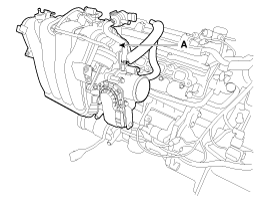
| 5. |
Disconnect the ETC (Electronic throttle control) connector (A) and the
MAPS (Manifold absolute pressure sensor) connector (B).
(Refer to Fuel System - "ETC System")
|
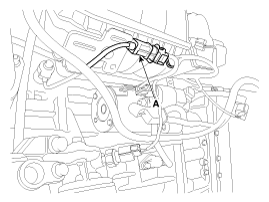
| 6. |
Disconnect the knock sensor connector (A).
|
| 7. |
Disconnect the PCV (Positive crankcase ventilation) hose (A) and the
PCSV (Purge control solenoid valve) hose (B).
|
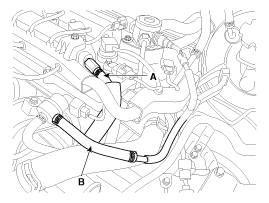
| 8. |
Disconnect the vacuum hose (A) and the throttle body coolant hoses (B).
|
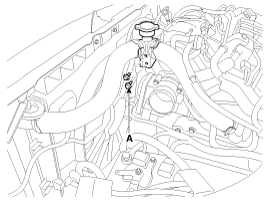
| 9. |
Unfasten the filler neck assembly mounting bolts (A).
|
| 10. |
Remove the intake manifold (A) with the gasket.
|

| 11. |
Install in the reverse order of removal.
|
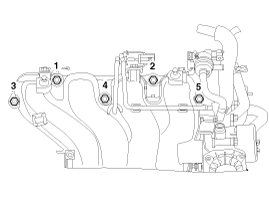
 Intake Manifold Components and components location
Components
1. Intake manifold assembly
2. Intake manifold gasket
3. Electronic throttle body gasket
4. Electronic throttle body
5. Bracket
...
 Exhaust Manifold Components and components location
Components
1. Heat protector
2. Exhaust manifold
3. Gasket
4. Exhaust manifold stay
...
Other information:
Kia Cee'd JD Service Manual: Components and components location
Component
1. Concentric slave cylinder
assembly
2. Manual transaxle
...
Kia Cee'd JD Service Manual: Power Window Switch Repair procedures
Inspection
Power Window Main Switch Inspection
1.
Disconnect the negative (-) battery terminal.
2.
Remove the front door trim.
(Refer to Body - "Front Door Trim")
3.
Disconnect the c ...
© 2017-2026 www.kceed.com
