Kia Cee'd: Interior Trim / Center Pillar Trim Repair procedures
(5Door)
[Center pillar lower trim]
| • |
Put on gloves to protect your hands.
|
|
| • |
Use a plastic panel removal tool to remove interior trim pieces
to protect from marring the surface.
|
| • |
Take care not to bend or scratch the trim and panels.
|
|
| 1. |
Remove the front door scuff trim.
(Refer to Interior Trim - "Door Scuff Trim")
|
| 2. |
Remove the rear door scuff trim.
(Refer to Interior Trim - "Door Scuff Trim")
|
| 3. |
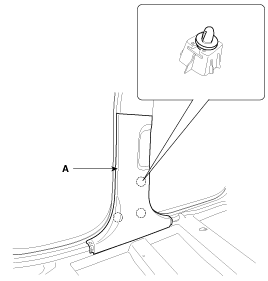
Using a screwdriver or remover, remove the center pillar lower trim
(A).
|
| 4. |
Install in the reverse order of removal.
| •
|
Replace any damaged clips.
|
|
|
[Center pillar upper trim]
| • |
Put on gloves to protect your hands.
|
|
| • |
Use a plastic panel removal tool to remove interior trim pieces
to protect from marring the surface.
|
| • |
Take care not to bend or scratch the trim and panels.
|
|
| 1. |
Remove the center pillar lower trim.
(Refer to Interior Trim - "Center Pillar Trim")
|
| 2. |
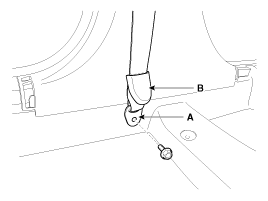
Remove the front seat belt lower anchor cover (B).
|
| 3. |
After loosening the mounting bolt, then remove the front seat belt lower
anchor (A).
|
Tightening torque :
39.2 ~ 53.9 N.m (4.0 ~ 5.5 kgf.m, 28.8 ~ 39.8 lb-ft)
|
|
| 4. |
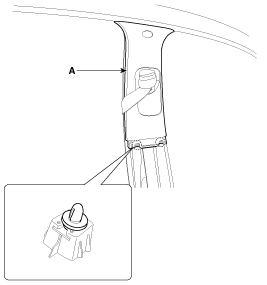
Using a screwdriver or remover, remove the center pillar upper trim
(A).
|
| 5. |
Install in the reverse order of removal.
| •
|
Replace any damaged clips.
|
|
|
(3Door)
[Rear inner outer trim]
| • |
Use a plastic panel removal tool to remove interior trim pieces
to protect from marring the surface.
|
| • |
Take care not to bend or scratch the trim and panels.
|
| • |
Put on gloves to protect your hands.
|
|
| 1. |
Remove the front door scuff trim.
(Refer to Interior Trim - "Door Scuff Trim")
|
| 2. |
Remove the rear wheel house trim.
(Refer to Interior Trim - "Rear Wheel House Trim")
|
| 3. |
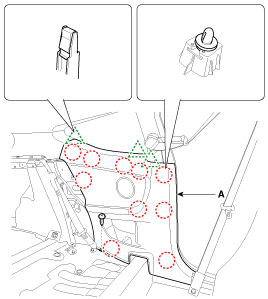
After loosening the mounting screw, then remove the rear inner outer
trim (A).
|
| 4. |
Install in the reverse order of removal.
| •
|
Replace any damaged clips.
|
|
|
[Center pillar upper trim]
| • |
Use a plastic panel removal tool to remove interior trim pieces
to protect from marring the surface.
|
| • |
Take care not to bend or scratch the trim and panels.
|
| • |
Put on gloves to protect your hands.
|
|
| 1. |
Remove the rear inner outer trim.
|
| 2. |
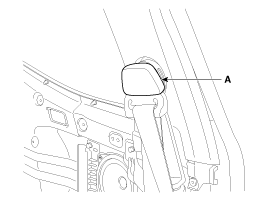
Remove the front seat belt upper anchor cover (A).
|
| 3. |
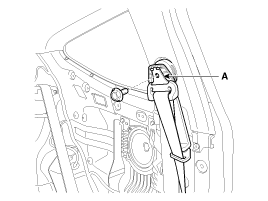
After loosening the mounting bolt, then remove the front seat belt upper
anchor (A).
|
Tightening torque :
39.2 ~ 53.9 N.m (4.0 ~ 5.5 kgf.m, 28.9 ~ 39.8 lb-ft)
|
|
| 4. |
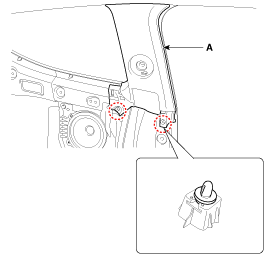
Using a screwdriver or remover, remove the center pillar upper trim
(A).
|
| 5. |
Install in the reverse order of removal.
| •
|
Replace any damaged clips.
|
|
|
Component Location
[5Door]
1. Center pillar lower trim
2. Center pillar upper trim
[3Door]
...
Component Location
1. Rear shelf side trim
...
 Center Pillar Trim Components and components location
 Rear Shelf Side Trim Components and components location


