Kia Cee'd: ABS(Anti-Lock Brake System) / ABS Control Module Repair procedures
Kia Cee'd JD Service Manual / Brake System / ABS(Anti-Lock Brake System) / ABS Control Module Repair procedures
| Removal [LHD] |
| 1. |
Turn the ignition switch OFF.
|
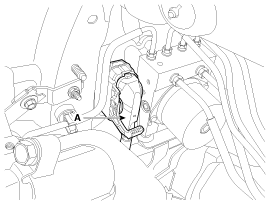
| 2. |
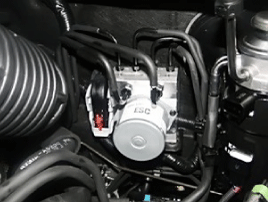
Pull up the lock of the HECU connector (A), and then disconnect the
connector.
|
| 3. |
Remove the brake fluid from the master cylinder reservoir with a syringe.
|

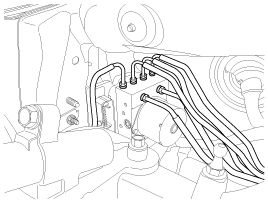
| 4. |
Disconnect the brake tubes from the HECU by unlocking the nuts counterclockwise
with a spanner.
|
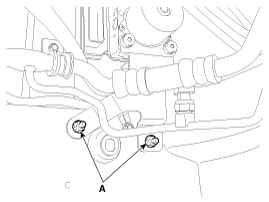
| 5. |
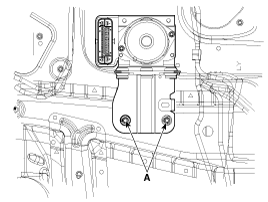
Loosen the HECU bracket nuts (A), and then remove HECU and bracket.
|
| 6. |
Remove the 3 bolts, and then remove the bracket from HECU.
|
| Removal [RHD] |
| 1. |
Turn ignition switch OFF and disconnect the negative (-) battery cable.
|
| 2. |
Remove the battery.
(Refer to Engine Electrical system-"Battery")
|
| 3. |
Remove the ECM.
(Refer to Engine control / Fuel System -"Engine Control Module")
|
| 4. |
Pull up the lock of the HECU connector (A), and then disconnect the
connector.
|
| 5. |
Remove the brake fluid from the master cylinder reservoir with a syringe.
|
| 6. |
Disconnect the brake tubes from the HECU by unlocking the nuts counterclockwise
with a spanner.
|
| 7. |
Loosen the HECU bracket nuts (A), and then remove HECU and bracket.
|
| 8. |
Remove the 3 bolts, and then remove the bracket from HECU.
|
| Installation |
| 1. |
Install in the reverse order of removal.
|
| 2. |
Tighten the HECU mounting bolts and nuts to the specified torque.
|
| 3. |
After installation, bleed the brake system.
(Refer to ABS bleeding)
|
| 4. |
When you have replaced the HECU always perform variant coding.
|
| Variant coding |
| 1. |
Connect the GDS to the data link connector.
|
| 2. |
Turn the ignition "ON".
|
| 3. |
Select vehicle name and system.
|
| 4. |
Select the variant coding.
|
| 5. |
Perform variant coding according to the instructions on the screen.
|
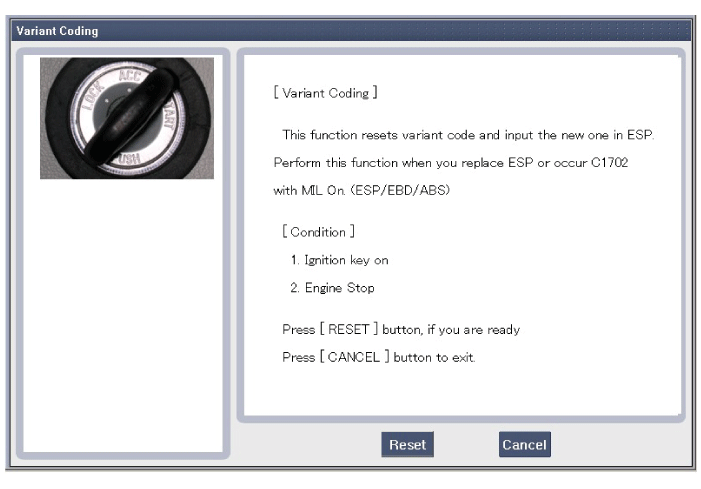
| 6. |
Ignition "OFF" and then ignition "ON".
|
| 7. |
The variant coding is completed.
|
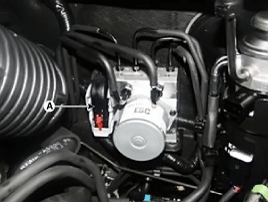
 ABS Control Module Components and components location
Components
1. Front - left tube
2. Rear - right tube
3. Rear - left tube
4. Front - right tube
5. MC2
6. MC1
7. ABS control module(HECU)
...
 Front Wheel Speed Sensor Components and components location
Components
1. Front wheel speed sensor
2. Front wheel speed sensor connector
...
Other information:
Kia Cee'd JD Service Manual: Brake Pedal Components and components location
Components [LHD]
1. Cowl bracket
2. Brake pedal member assembly
3. Stop lamp switch
4. Return spring
5. Brake pedal
6. Bolt
Components [RHD]
1. Cowl bracket
2. Brake pedal member assembly
...
Kia Cee'd JD Owners Manual: Closing the hood
1. Before closing the hood, check the following:
All filler caps in engine compartment
must be correctly installed.
Gloves, rags or any other combustible
material must be removed
from the engine compartment.
2. Return the support rod to its clip to
prevent it from rattling.
3. L ...
© 2017-2026 www.kceed.com
