Kia Cee'd: Heater / Temperature Control Actuator Repair procedures
Kia Cee'd JD Service Manual / Heating,Ventilation, Air Conditioning / Heater / Temperature Control Actuator Repair procedures
| Inspection |
| 1. |
Turn the ignition switch OFF.
|
| 2. |
Disconnect the temperature control actuator connector.
|
| 3. |
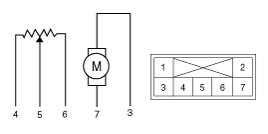
Verify that the temperature control actuator operates to the warm position
when connecting 12V to terminal 3 and grounding terminal 4.
Verify that the temperature control actuator operates to the cool position
when connected in reverse.
|
| 4. |
Connect the temperature control actuator connector.
|
| 5. |
Turn the ignition switch ON.
|
| 6. |
Check the voltage between terminal 4 and 5.
Specification
It will feedback the current position of the actuator to the controls.
|
| 7. |
If the measured voltage is not specification, substitute with a known-good
temperature control actuator and check for proper operation.
|
| 8. |
If the problem is corrected, replace the temperature control actuator.
|
| Replacement |
[Driver’s Temperature Control Actuator]
| 1. |
Disconnect the negative (-) battery terminal.
|
| 2. |
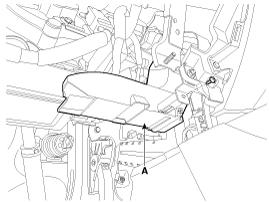
Remove the crash pad lower panel.
(Refer to Body - "Crash Pad Lower Panel")
|
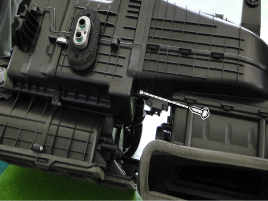
| 3. |
Remove the driver side shower duct (A) after loosening the screw.
|
| 4. |
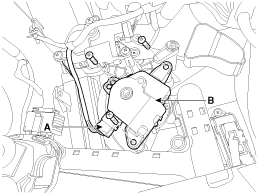
Disconnect the connector (A) and then remove the temperature control
actuator (B) after loosening the mounting screws.
|
| 5. |
Install in the reverse order of removal.
|
[Passenger’s Temperature Control Actuator]
| 1. |
Disconnect the negative (-) battery terminal.
|
| 2. |
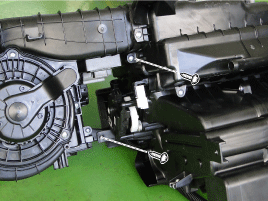
Remove the heater & blower assembly.
(Refer to Heater - "Heater Unit")
|
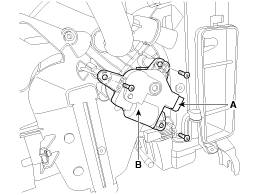
| 3. |
Separate the blower unit from the heater unit after loosening 3 screws.
|
| 4. |
Disconnect the connector (A) and then remove the temperature control
actuator (B) after loosening the mounting screws.
|
| 5. |
Install in the reverse order of removal.
|
 Temperature Control Actuator Description and operation
Description
The heater unit includes mode control actuator and temperature control actuator.
The temperature control actuator is located at the heater unit. It regulates
the t ...
 Mode Control Actuator Description and operation
Description
The mode control actuator is located at the heater unit.
It adjusts the position of the mode door by operating the mode control actuator
based on signal of A/C cont ...
Other information:
Kia Cee'd JD Owners Manual: Basic Mode Screen
(1) Mode
Displays currently operating mode.
(2) Operation State
From Repeat/Random/Scan, displays
the currently operating function.
(3) Track Info
Displays information about the current
track.
(4) Play/Pause
Changes the play/pause state.
(5) Play Time
Displays the current play time.
...
Kia Cee'd JD Service Manual: Thermostat Repair procedures
Removal
Disassembly of the thermostat would have an adverse effect, causing
a lowering of cooling efficiency.
1.
Drain engine coolant so that its level would be under the therm ...
© 2017-2026 www.kceed.com
