Kia Cee'd: Tail Gate / Tail Gate Assembly Repair procedures
Kia Cee'd JD Service Manual / Body (Interior and Exterior) / Tail Gate / Tail Gate Assembly Repair procedures
| Replacement |
|

|

| 1. |
Remove the tail gate upper trim.
(Refer to Tail Gate - "Tail Gate Trim")
|
| 2. |
Remove the tail gate trim.
(Refer to Tail Gate - "Tail Gate Trim")
|
| 3. |
Remove the tail gate side trim.
(Refer to Tail Gate - "Tail Gate Trim")
|
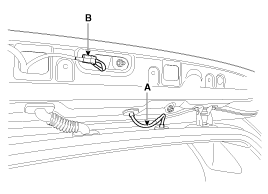
| 4. |
Disconnect the washer nozzle hose (A) and high mounted stop lamp connector
(B).
|
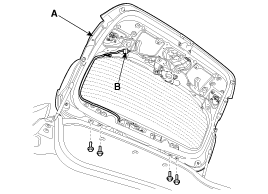
| 5. |
Disconnect the connectors and tail gate wiring harness (B).
|
| 6. |
After loosening the mounting bolts, then remove the tail gate assembly
(A).
|
| 7. |
Using a screwdriver, lift the socket clips (A) up slightly on both ends
of the tail gate lifter (B).
|

| 8. |
Install in the reverse order of removal.
|
 Tail Gate Assembly Components and components location
Component Location
1. Tail gate assembly
...
 Tail Gate Trim Components and components location
Component Location
1. Tail gate trim
...
Other information:
Kia Cee'd JD Service Manual: ISG (Idle Stop & Go) Repair procedures
Inspection
1.
Remove the ISG switch from the switch assembly.
2.
Check the continuity between the switch 3 and 6 terminals as the ISG
OFF switch is engaged.
Removal
1.
Tur ...
Kia Cee'd JD Service Manual: Rear Wiper Motor Repair procedures
Inspection
Rear Wiper Motor
1.
Remove the 4P connector from the rear wiper motor.
2.
Connect battery positive (+) and negative (-) cables to terminals 3
and 4 respectively.
3.
Check that the motor ...
© 2017-2025 www.kceed.com
