Kia Cee'd: Front Door / Repair procedures
Glass Adjustment
| • |
Check the glass run channel for damage or deterioration, and
replace them if necessary.
|
|
| 1. |
Remove the front door trim.
(Refer to Front Door - "Front Door Trim")
|
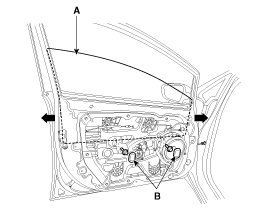
| 2. |
Remove the front door window glass mounting hole plug (B).
|
| 3. |
Carefully move the front door window glass (A) until the glass mounting
bolts are visible, then loosen them.
|
| 4. |
Check that the glass moves smoothly.
|
Door Striker Adjustment
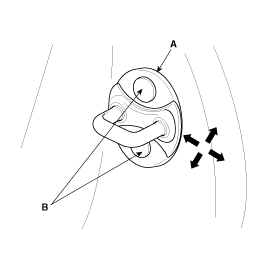
| • |
Make sure the door latches securely without slamming it. If
necessary adjust the striker (A): The striker nuts are fixed.
The striker can be fine adjusted up or down, and in or out.
|
|
| 1. |
Loosen the screws (B) just enough for the striker to move.
|
Tightening torque :
(B) : 16.7 ~ 21.6 N.m (1.7 ~ 2.2 kgf.m, 12.3 ~ 15.9 lb-ft)
|
|
| 2. |
Tap on the striker with a plastic hammer to adjust the striker. The
striker will not move much, but will give some adjustment.
|
| 3. |
Hold the outer handle out, and push the door against the body to be
sure the striker allows a flush fit. If the door latches properly, tighten
the screws and recheck.
|
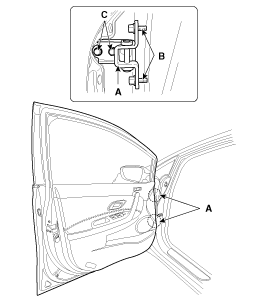
Door Position Adjustment
| • |
After installing the door, check for a flush fit with the body,
then check for equal gaps between the front, rear, and bottom,
door edges and the body. Check that the door and body edges
are parallel. Before adjusting, replace the mounting bolts.
|
|
| 1. |
Check that the door and body edges are parallel.
|
| 2. |
Place the vehicle on a firm, level surface when adjusting the doors.
|
| 3. |
Adjust at the hinges (A) :
| • |
Loosen the door mounting bolts slightly, and move the door in
or out until it aligns flush with the body.
|
| • |
Loosen the hinge mounting bolts slightly, and move the door
backward or forward, up or down as necessary to equalize the
gaps.
|
| • |
Place a shop towel on the jack to prevent damage to the door
when adjusting the door.
|
|
Tightening torque :
(B) : 21.6 ~ 26.5 N.m (2.2 ~ 2.7 kgf.m, 15.9 ~ 19.5 lb-ft)
(C) : 33.3 ~ 41.2 N.m (3.4 ~ 4.2 kgf.m, 24.6 ~ 30.4 lb-ft)
|
|
| 4. |
Grease the pivot portions of the hinges indicated.
|
| 5. |
Check for water leaks.
|
Components
1. Front door tirm
2. Front door grip handle cover
3. Front door inside handle housing
4. Front door pull handle cap
5. Front door module ...
Component Location
1. Front door trim
...
Other information:
Kia Cee'd JD Service Manual: Components and components location
Components
1. Hands free call switch
2. Mic
3. Front left speaker
4. Front right speaker
5. Audio head unit (hands free control)
※ There is no hands free jack.
This system supports Bluetooth(wireless system).
...
Kia Cee'd JD Service Manual: Troubleshooting
Troubleshooting
Symptom
Suspect area
Remedy
Engine misfire with abnormal internal lower engine noises.
Loose or improperly installed engine flywheel.
Repair or replace the flywheel as required.
...

 Components and components location
 Front Door Trim Components and components location