Kia Cee'd: Headlight and front fog light aiming / Headlight aiming
Without AFLS
1. Inflate the tires to the specified pressure and remove any loads from the vehicle except the driver, spare tire, and tools.
2. The vehicle should be placed on a flat floor.
3. Draw vertical lines (Vertical lines passing through respective head lamp centers) and a horizontal line (Horizontal line passing through center of head lamps) on the screen.
4. With the head lamp and battery in normal condition, aim the head lamps so the brightest portion falls on the horizontal and vertical lines.
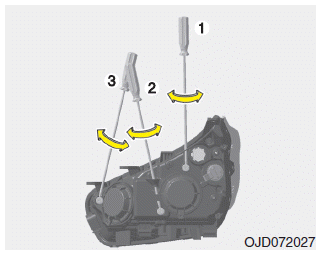
5. To aim the low beam left or right, turn the driver (1) clockwise or counterclockwise. To aim the low beam up or down, turn the driver (2) clockwise or counterclockwise.
To aim the high beam up or down, turn the driver (3) clockwise or counterclockwise.
With AFLS
1. Turn off the engine
2. Turn the light switch to the low beam position.
3. Position the tires straight ahead with the steering wheel.
4. Turn on the engine.
5. Inflate the tires to the specified pressure and remove any loads from the vehicle except the driver, spare tire, and tools.
6. The vehicle should be placed on a flat floor.
7. Draw vertical lines (Vertical lines passing through respective head lamp centers) and a horizontal line (Horizontal line passing through center of head lamps) on the screen.
8. With the head lamp and battery in normal condition, aim the head lamps so the brightest portion falls on the horizontal and vertical lines.
9. To aim the low beam left or right, turn the driver (1) clockwise or counterclockwise. To aim the low beam up or down, turn the driver (2) clockwise or counterclockwise. To aim the high beam up or down, turn the driver (3) clockwise or counterclockwise.

 Front fog light aiming
The front fog lamp can be aimed as the
same manner of the head lamps aiming.
With the front fog lamps and battery normal
condition, aim the front fog lamps. To
aim the front fog lamp up or d ...
Other information:
Kia Cee'd JD Service Manual: Specifications
Specification
Item
Specification
Ultrasonic sensor
Voltage rating
DC 12 V
Detecting range
30 cm ~ 120 cm
Operation voltage
DC 9 ~ 16 V
...
Kia Cee'd JD Owners Manual: Electronic stability control (ESC)
The Electronic Stability Control (ESC)
system is designed to stabilize the vehicle
during cornering maneuvers. ESC
checks where you are steering and
where the vehicle is actually going. ESC
applies the brakes at individual wheels
and intervenes with engine management
system to stabil ...
