Kia Cee'd: ESP(Electronic Stability Program) System / ESP Control Module Repair procedures
| 1. |
Turn the ignition switch OFF.
|
| 2. |
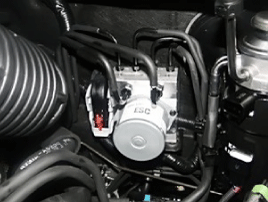
Pull up the lock of the HECU connector (A) , then disconnect the connector.
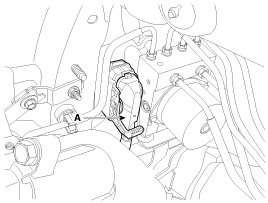
|
| 3. |
Remove the brake fluid from the master cylinder reservoir with a syringe.
| •
|
Be sure to completely remove foreign substances from
around brake fluid reservoir and cap before opening
the reservoir cap. If not, it may cause contamination
of brake fluid and deterioration in braking performance.
|
| •
|
Do not spill brake fluid on the vehicle, it may damage
the paint; if brake fluid does contact the paint, wash
it off immediately with water.
|
|
|
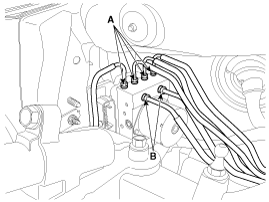
| 4. |
Disconnect the brake tubes from the HECU by unlocking the nuts counterclockwise
with a spanner.
|
Tightening torque:
A : 12.7 ~ 16.7 N.m (1.3 ~ 1.7 kgf.m, 9.4 ~ 12.3 lb-ft)
B : 18.6 ~ 22.6 N.m (1.9 ~ 2.3 kgf.m, 13.7 ~ 16.6 lb-ft)
|
|
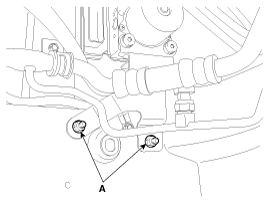
| 5. |
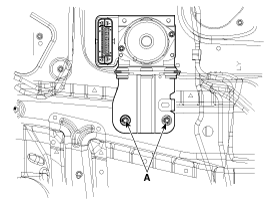
Loosen the HECU bracket nuts (A), then remove HECU and bracket.
|
Tightening torque :
16.7 ~ 25.5 N.m (1.7 ~ 2.6 kgf.m, 12.3 ~ 18.8 lb-ft)
|
| 1) |
Never attempt to disassemble the HECU.
|
|
|
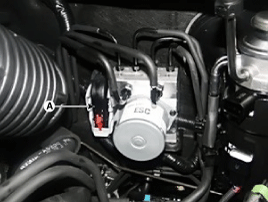
| 6. |
Remove the 3 bolts, then remove the bracket from HECU.
|
Tightening torque :
7.8 ~ 9.8 N.m (0.8 ~ 1.0 kgf.m, 5.8 ~ 7.2 lb-ft)
|
|
| 1. |
Turn ignition switch OFF and disconnect the negative (-) battery cable.
|
| 2. |
Remove the battery.
(Refer to Engine Electrical system-"Battery")
|
| 3. |
Remove the ECM.
(Refer to Engine control / Fuel System -"Engine Control Module")
|
| 4. |
Pull up the lock of the HECU connector (A), and then disconnect the
connector.
|
| 5. |
Remove the brake fluid from the master cylinder reservoir with a syringe.
| •
|
Be sure to completely remove foreign substances from
around brake fluid reservoir and cap before opening
the reservoir cap. If not, it may cause contamination
of brake fluid and deterioration in braking performance.
|
| •
|
Do not spill brake fluid on the vehicle, it may damage
the paint; if brake fluid does contact the paint, wash
it off immediately with water.
|
|
|
| 6. |
Disconnect the brake tubes from the HECU by unlocking the nuts counterclockwise
with a spanner.
|
Tightening torque :
12.7 ~ 16.7 N.m (1.3 ~ 1.7 kgf.m, 9.4 ~ 12.3 lb-ft)
18.6 ~ 22.6 N.m (1.9 ~ 2.3 kgf.m, 13.7 ~ 16.6 lb-ft)
|
|
| 7. |
Loosen the HECU bracket nuts (A), and then remove HECU and bracket.
|
Tightening torque :
16.7 ~ 25.5 N.m (1.7 ~ 2.6 kgf.m, 12.3 ~ 18.8 lb-ft)
|
| 1) |
Never attempt to disassemble the HECU.
|
|
|
| 8. |
Remove the 3 bolts, and then remove the bracket from HECU.
|
Tightening torque :
7.8 ~ 9.8 N.m (0.8 ~ 1.0 kgf.m, 5.8 ~ 7.2 lb-ft)
|
|
| 1. |
Install in the reverse order of removal.
|
| 2. |
Tighten the HECU mounting bolts and nuts to the specified torque.
|
| 3. |
After installation, bleed the brake system.
(Refer to ESP bleeding)
|
| 4. |
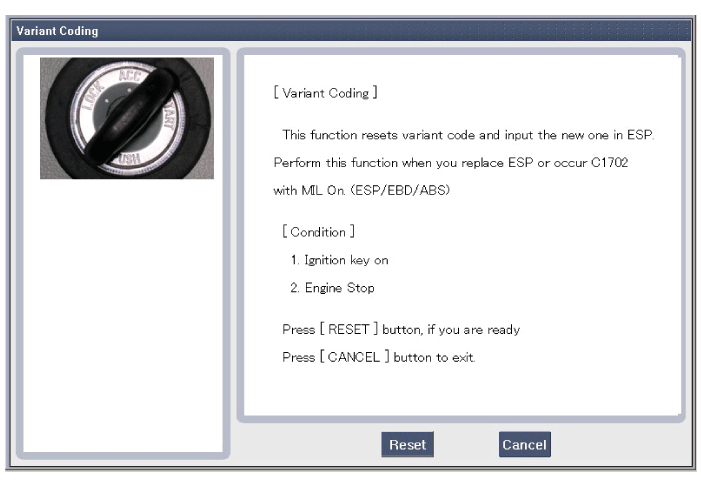
When you have replaced the HECU always perform variant coding.
|
In a case of replacing HECU, operate the following functions.
| 1) |
"Steering Angle Sensor Calibration" for steering angle
sensor offset correction.
|
| 2) |
"Longitudinal Sensor Calibration" for Longitudinal sensor
offset correction.
|
|
|
| 1. |
Connect the GDS to the data link connector.
|
| 2. |
Turn the ignition "ON".
|
| 3. |
Select vehicle name and system.
|
| 4. |
Select the variant coding.
|
| 5. |
Perform variant coding according to the instructions on the screen.
|
| 6. |
Ignition "OFF" and then ignition "ON".
|
| 7. |
The variant coding is completed.
|
Components
1. Front - left tube
2. Rear - right tube
3. Rear - left tube
4. Front - right tube
5. MC2
6. MC1
7. ESP control module(HECU)
...
Description
When the vehicle is turning with respect to a vertical axis the yaw rate sensor
detects the yaw rate electronically by the vibration change of plate fork inside
the y ...
Other information:
Kia Cee'd JD Owners Manual: Underbody maintenance
Corrosive materials used for ice and
snow removal and dust control may collect
on the underbody. If these materials
are not removed, accelerated rusting can
occur on underbody parts such as the
fuel lines, frame, floor pan and exhaust
system, even though they have been
treated with rus ...
Kia Cee'd JD Owners Manual: Notes on the safe use of the Tire
Mobility Kit
Park your car at the side of the
road so that you can work with the
Tire Mobility Kit away from moving
traffic.
To be sure your vehicle will not
move, even when you're on fairly
level ground, always set your parking
brake.
Only use the Tire Mobility Kit for
sealing/inflat ...


 ESP Control Module Components and components location
 Yaw-rate and Lateral G Sensor Description and operation