Kia Cee'd: Driveshaft Assembly / Dynamic Damper Repair procedures
Kia Cee'd JD Service Manual / Driveshaft and axle / Driveshaft Assembly / Dynamic Damper Repair procedures
| Replacement |
| 1. |
Remove the front driveshaft.
(Refer to Driveshaft Assembly - “Front Driveshaft”)
|
| 2. |
Remove the TJ joint assembly.
(Refer to Driveshaft Assembly - “TJ Joint”)
|
| 3. |
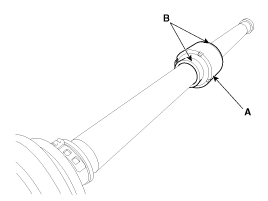
Remove the remove the both side of band (B) of the dynamic damper (A).
|
| 4. |
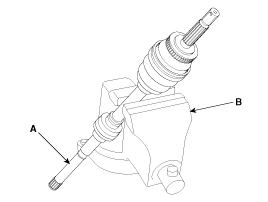
Fix the driveshaft (A) with a vice (B) as illustrated.
|
| 5. |
Apply soap powder on the shaft to prevent being damaged between the
shaft spline and the dynamic damper when the dynamic damper is removed.
|
| 6. |
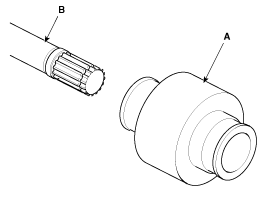
Seperate the dynamic damper (A) from the shaft (B) carefully.
|
| Installation |
| 1. |
Apply soap powder on the shaft to prevent being damaged between the
shaft spline and the dynamic damper.
|
| 2. |
Install the dynamic damper.
|
| 3. |
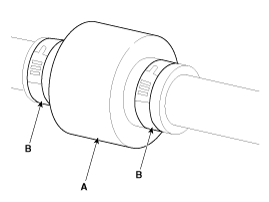
Install the dynamic damper band (A).
|
| 4. |
Using the SST(09495-3K000), secure the TJ boot bands (B).
|
| 5. |
Install the TJ joint assembly.
(Refer to Driveshaft Assembly - “TJ joint”)
|
| 6. |
Install the front driveshaft.
(Refer to Driveshaft Assembly - “Front Driveshaft”)
|
 Dynamic Damper Components and components location
Components
1. BJ
assembly
2. BJ circlip
3. BJ boot band
4. BJ boot
5. Dynamic
damper band
6. Dynamic damper
7. Shaft
8. TJ boo ...
 BJ Boot Components and components location
Components
1. BJ
assembly
2. BJ circlip
3. BJ boot band
4. BJ boot
5. Dynamic
damper band
6. Dynamic damper
7. Shaft
8. TJ boo ...
Other information:
Kia Cee'd JD Owners Manual: Closing the fuel filler lid
1. To install the cap, turn it clockwise until
it “clicks”. This indicates that the cap is
securely tightened.
2. To close the lid, press the edge of the
lid. Make sure it is securely closed.
WARNING - Refueling
If pressurized fuel sprays out, it
can cover your clothes or skin
...
Kia Cee'd JD Owners Manual: Heating
1. Set the mode to the position.
2. Set the air intake control to the outside
(fresh) air position.
3. Set the temperature control to the
desired position.
4. Set the fan speed control to the
desired speed.
5. If dehumidified heating is desired, turn
the air conditioning system on.
• ...
© 2017-2025 www.kceed.com


