Kia Cee'd: Charging System / DC DC Converter Repair procedures
Kia Cee'd JD Service Manual / Engine Electrical System / Charging System / DC DC Converter Repair procedures
| Removal |
| 1. |
Disconnect the battery negative terminal.
|
| 2. |
Remove the glove box housing.
(Refer to Body - "Glove Box Housing")
|
| 3. |
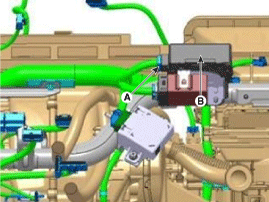
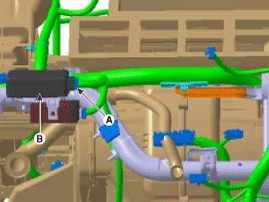
Disconnect the DC/DC converter conector (A).
|
| 4. |
Remove the DC/DC converter (B) after removing nuts.
[LHD]
[RHD]
|
| Installation |
| 1. |
Install in the reverse order of removal.
|

 DC DC Converter Schematic diagrams
Circuit Diagram
...
 Battery Description and operation
Description
1.
The MF(Maintenance Free) battery is, as the name implies, totally maintenance
free and has no removable battery cell caps.
2.
...
Other information:
Kia Cee'd JD Owners Manual: Engine compartment
■ Gasoline engine (Gamma 1.6GDI)
■ Gasoline engine (Gamma 1.6MPI)
1. Engine oil filler cap
2. Brake/clutch fluid reservoir
3. Positive battery terminal
4. Negative battery terminal
5. Fuse box
6. Air cleaner
7. Radiator cap
8. Engine coolant reservoir
9. Engine oil dipstick
10. Wi ...
Kia Cee'd JD Owners Manual: Jack and tools
The jack, jack handle, wheel lug nut
wrench are stored in the luggage
compartment.
Pull up the luggage box cover to
reach this equipment.
(1) Jack handle
(2) Jack
(3) Wheel lug nut wrench
Jacking instructions
The jack is provided for emergency
tire changing only.
To prevent the jack ...
© 2017-2026 www.kceed.com
