Kia Cee'd: Airbag Module / Curtain Airbag (CAB) Module Repair procedures
Kia Cee'd JD Service Manual / Restraint / Airbag Module / Curtain Airbag (CAB) Module Repair procedures
| Removal |
| 1. |
Disconnect the battery negative cable and wait for at least thirty seconds
before beginning work.
|
| 2. |
Remove the roof trim assembly.
(Refer to Body - "Roof trim assembly")
|
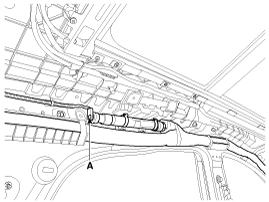
| 3. |
Disconnect the curtain airbag harness connector (A).
|
| 4. |
After loosening the mounting bolts remove the curtain airbag.
|
| Installation |
| 1. |
Remove the ignition key from the vehicle.
|
| 2. |
Disconnect the battery negative cable and wait for at least thirty seconds.
|
| 3. |
Tighten the curtain airbag mounting bolts.
|

| 4. |
Connect the curtain airbag connector.
|
| 5. |
Install the roof trim assembly.
(Refer to Body - "Roof trim assembly")
|
| 6. |
Reconnect the battery negative cable.
|
| 7. |
After installing the curtain airbag (CAB), confirm proper system operation:
|

 Airbag Module Disposal Description and operation
Airbag Disposal
Special tool required
Deployment tool 0957A-34100A
Before scrapping any airbags or side airbags (including those in a whole vehicle
to be scrapped ...
Other information:
Kia Cee'd JD Owners Manual: Turn signal light
Follow the steps 1 to 7 from the previous
page.
8. Remove the socket from the assembly
by turning the socket counterclockwise
until the tabs on the socket align with
the slots on the assembly.
9. Remove the bulb from the socket by
pressing it in and rotating it counterclockwise
until ...
Kia Cee'd JD Owners Manual: Starting the diesel engine
To start the diesel engine when the
engine is cold, it has to be pre-heated
before starting the engine and then have
to be warmed up before starting to drive.
1.Make sure the parking brake is
applied.
2.Manual Transaxle - Depress the
clutch pedal fully and shift the
transaxle into Neut ...
© 2017-2026 www.kceed.com
