
Kia Cee'd: Interior features / Cargo area cover (3 Door and 5 Door)
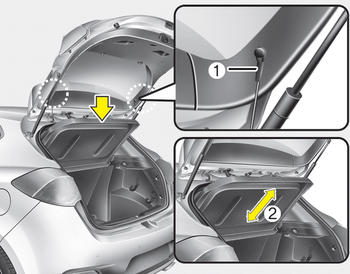
Use the cover to hide items stored in the cargo area.
The cargo area cover will be lifted when the tailgate is opened. Disconnect the strap (1) from holder if you want to return the cover to original position. To remove the cargo area cover completely, lift the cover to a 43-degree angle and pull it out to the full (2). For installation of the cover, reverse the removal procedure.
CAUTION
- When you return the cargo area cover to its original position, hold the cover and lower it.
- Do not operate the vehicle with the cover removed. It may damage to the cover.
- The cargo area cover may be lifted when the tailgate is opened. Ensure that the luggage on the cover is moved to a safe place.
- Since the cargo area cover may be damaged or malformed, do not apply excessive force to the cover or do not put the heavy loads on it.
WARNING
- Do not place objects on the cargo area cover while driving. Such objects may be thrown about inside the vehicle and possibly injure vehicle occupants during an accident or when braking.
- Never allow anyone to ride in the luggage compartment. It is designed for luggage only.
- Maintain the balance of the vehicle and locate the weight as far forward as possible.
 Luggage net (holder)
■ Type A
■ Type B (for wagon)
• Front
■ Type B (for wagon)
• Rear
To keep items from shifting in the cargo
area, you can use the four holders located
in the cargo area to at ...
 Barrier net (wagon)
Your vehicle is equipped with a barrier net.
When you load some cargoes on the rear
seat or rear cargo area, you must install
the barrier net behind front seatback or
rear seatback.
It is de ...
Other information:
Kia Cee'd JD Service Manual: Trailing Arm Repair procedures
Replacement
1.
Loosen the wheel nuts slightly.
Raise the vehicle, and make sure it is securely supported.
2.
Remove the rear wheel and tire (A) from rear hub.
Tightening torque:
88.2 ~ 1 ...
Kia Cee'd JD Service Manual: Electronic Parking Brake (EPB) Description and operation
Description
The EPB is an electronic parking brake.
The EPB is different from existing parking systems which operated with the brake
pedal or the lever type. The EPB system sends the signal to the ECU when a driver
operates the EPB switch. The ECU operates the EPB actuato ...
