Kia Cee'd: Tail Gate / Tail Gate Latch Repair procedures
Kia Cee'd JD Service Manual / Body (Interior and Exterior) / Tail Gate / Tail Gate Latch Repair procedures
| Replacement |
|

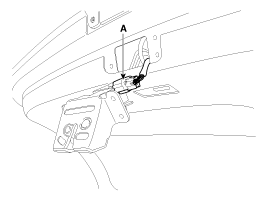
| 1. |
After loosening the mounting bolts, then remove the tail gate latch
assembly (A).
|
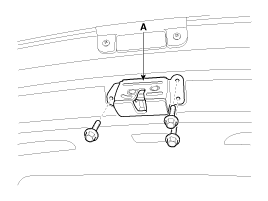
| 2. |
Disconnect the tail gate latch connector (A).
|
| 3. |
Install in the reverse order of removal.
|

 Tail Gate Latch Components and components location
Component Location
1. Tail gate latch assembly
...
 Tail Gate Lift Repair procedures
Replacement
•
Take care to not let the tailgate fall on you as the lifts are
r ...
Other information:
: Rollover Warning. The Better Business Bureau Auto Line Program
Rollover Warning
WARNING: Utility vehicles have a
significantly higher rollover rate than
other types of vehicles.
WARNING: Vehicles with a higher
center of gravity (utility and four-wheel
drive vehicles) handle differently than
vehicles with a lower center of gravity
(passenger cars). Avoid s ...
Kia Cee'd JD Owners Manual: Tilting the sunroof
When the sunshade is closed
If you push the sunroof control lever
upward, the sunshade will slide all the
way open then the sunroof glass will tilt.
To stop the sunroof movement at any
point, pull or push the sunroof control
lever momentarily.
When the sunshade is opened
If you push th ...
© 2017-2026 www.kceed.com
