Kia Cee'd: Roof Trim / Roof Trim Assembly Repair procedures
Kia Cee'd JD Service Manual / Body (Interior and Exterior) / Roof Trim / Roof Trim Assembly Repair procedures
| Replacement |
|

|

| 1. |
Remove the rear seat assembly.
(Refer to Rear Seat - "Rear Seat Assembly")
|
| 2. |
Remove the front pillar trim.
(Refer to Interior Trim - "Front Pillar Trim")
|
| 3. |
Remove the canter pillar upper trim.
(Refer to Interior Trim - "Center Pillar Trim")
|
| 4. |
Remove the luggage side trim.
(Refer to Interior Trim - "Luggage Side Trim")
|
| 5. |
Remove the rear pillar trim.
(Refer to Interior Trim - "Rear Pillar Trim")
|
| 6. |
Remove the sunvisor and retainer.
(Refer to Roof Trim - "Sunvisor")
|
| 7. |
Remove the assist handle.
(Refer to Roof Trim - "Assist Handle")
|
| 8. |
Remove the overhead console lamp.
|
| 9. |
Remove the room lamp. [General type]
|
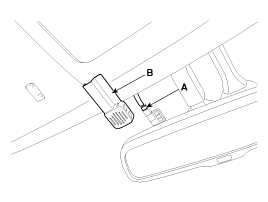
| 10. |
Remove the ECM mirror cover (B).
|
| 11. |
Disconnect the ECM mirror connector (A).
|
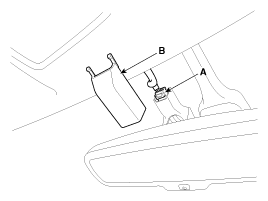
| 12. |
Remove the auto defog sensor cover (B).
|
| 13. |
Disconnect the auto defog sensor connector (A).
|
| 14. |
Remove the rain sensor cover (B).
|
| 15. |
Disconnect the rain sensor connector (A).
|
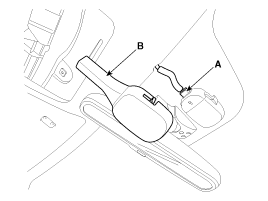
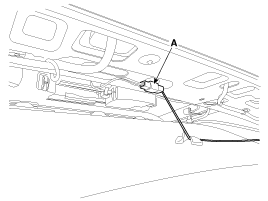
| 16. |
Disconnect the roof trim main connector (A) and the mounting clips in
the front pillar.
|
| 17. |
Disconnect the roof antenna connector (A) and the mounting clips in
the front pillar.
|
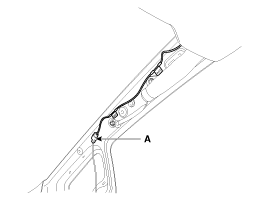
| 18. |
Disconnect the roof antenna connector (A).
|
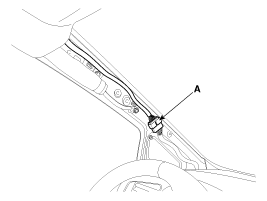
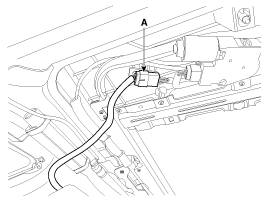
| 19. |
Disconnect the panoramaroof motor connector (A).
|
| 20. |
Detach the clips, then remove the roof trim assembly (A).
|

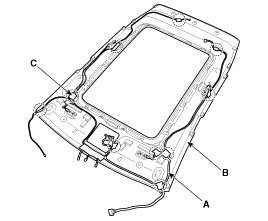
| 21. |
Remove the vanity lamp.
|
| 22. |
Remove the hands free mic.
|
| 23. |
Remove roof trim wiring harness (A) from the roof trim (B).
|

| 24. |
Install in the reverse order of removal.
|
 Roof Trim Assembly Components and components location
Component Location
1. Roof Trim Assembly
...
 Interior Trim
...
Other information:
Kia Cee'd JD Service Manual: Idler Repair procedures
Removal and Installation
1.
Remove the drive belt.
(Refer to Timing System - "Dreve Belt")
2.
Remove the idler (A).
Tightening torque :
42.2 ~ 53.9 N.m (4.3 ~ 5.5 kgf.m, 31.1 ~ ...
Kia Cee'd JD Owners Manual: Hitches
It's important to have the correct hitch
equipment. Crosswinds, large trucks
going by, and rough roads are a few reasons
why you’ll need the right hitch. Here
are some rules to follow:
Do you have to make any holes in the
body of your vehicle when you install a
trailer hitch? I ...
© 2017-2026 www.kceed.com
