Kia Cee'd: Keyless Entry and Burglar Alarm / Repair procedures
Kia Cee'd JD Service Manual / Body Electrical System / Keyless Entry and Burglar Alarm / Repair procedures
| Inspection |
Front Door Lock Module Inspection
| 1. |
Remove the front door trim.
(Refer to Body - "Front Door Trim")
|
| 2. |
Remove the front door module.
(Refer to Body - "Front Door Module")
|
| 3. |
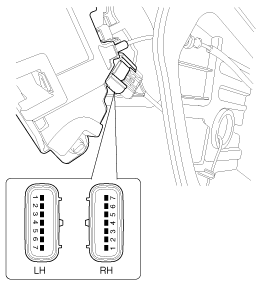
Disconnect the connector from the actuator.
|

| 4. |
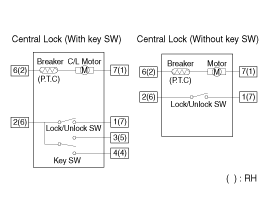
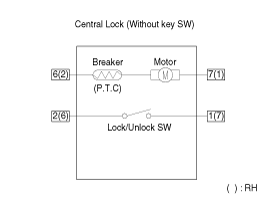
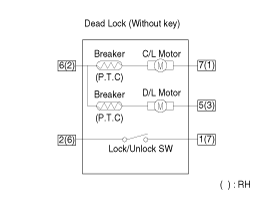
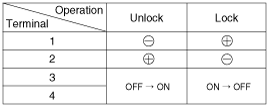
Check actuator operation by connecting power and ground according to
the table. To prevent damage to the actuator, apply battery voltage
only momentarily.
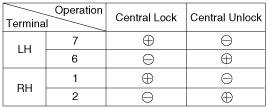
[Central Lock]
[Dead Lock]
|
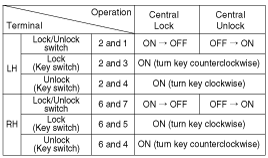
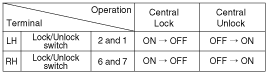
| 5. |
Check for continuity between the terminals in each switch position according
to the table.
[Central Lock]
|
Rear Door Lock Module Inspection
| 1. |
Remove the rear door trim.
(Refer to Body - "Rear Door Trim")
|
| 2. |
Remove the rear door module.
(Refer to Body - "Rear Door Module")
|
| 3. |
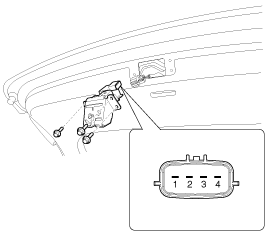
Disconnect the connector from the actuator.
|
| 4. |
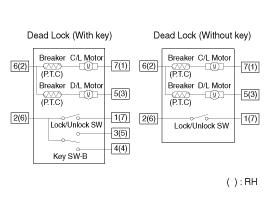
Check actuator operation by connecting power and ground according to
the table. To prevent damage to the actuator, apply battery voltage
only momentarily.
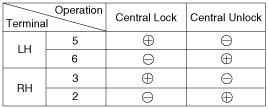
[Central Lock]
[Dead Lock]
|
| 5. |
Check for continuity between the terminals in each switch position according
to the table.
[Central / Dead Lock]
|
Tailgate Release Module Inspection
| 1. |
Remove the tailgate trim.
(Refer to Body - "Tailgate Trim")
|
| 2. |
Disconnect the connector from the actuator.
|
| 3. |
Check actuator operation by connecting power and ground according to
the table. To prevent damage to the actuator, apply battery voltage
only momentarily.
|
Tailgate Open Switch Inspection
| 1. |
Remove the tailgate open switch bracket (A) after loosening screws.
|
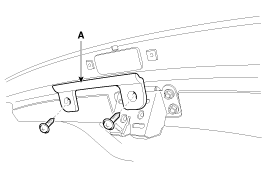
| 2. |
Remove the switch and disconnect the connector from the switch.
|

| 3. |
Check for continuity between the terminals in each switch position according
to the table.
|

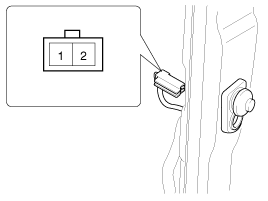
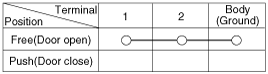
Door Switch Inspection
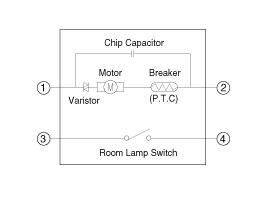
Remove the door switch and check for continuity between the terminals.
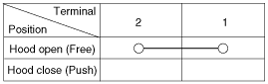
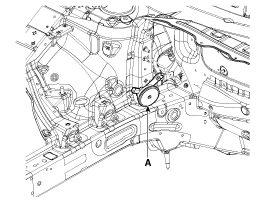
Hood Switch Inspection
| 1. |
Disconnect the connector from the hood switch (A).
|
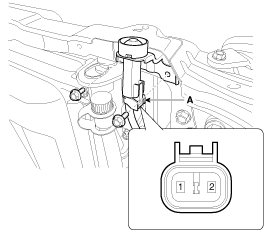
| 2. |
Check for continuity between the terminals and ground according to the
table.
|
Burglar Horn Inspection
| 1. |
Remove the burglar horn (A) after removing 1 bolt and disconnect the
connector from the burglar horn.
|
| 2. |
Test the burglar horn by connecting battery power to the terminal 1
and ground the terminal 2.
|
| 3. |
The burglar horn should make a sound. If the burglar horn fails to make
a sound replace it.
|
 Description and operation
Description
Burglar Alarm State [B/A State]
B/A State
Description
DISARM
1)
In "DISARM ...
 Transmitter Specifications
Specification
Item
Description
Power source
3V
Operating temperature
-20°C ~ +60°C (-4°F ~ ...
Other information:
Kia Cee'd JD Owners Manual: Paddle shifter
The paddle shifter is available when the
shift lever is in the D (Drive) position or
the sports mode.
With the shift lever in the D position
The paddle shifter will operate when the
vehicle speed is more than 10km/h.
Pull the [+] or [-] paddle shifter once to
shift up or down one gear a ...
Kia Cee'd JD Service Manual: Specifications
Specifications
Items
Specification
Rated voltage
DC 12V
Operating voltage
9V ~ 16V
Operating speed
30㎞/h ~ 250㎞/h
Sensible distance
...
© 2017-2026 www.kceed.com
