Kia Cee'd: Lighting System / Rear Fog Lamps Repair procedures
| Inspection |
| 1. |
Disconnect the negative (-) battery terminal.
|
| 2. |
Remove the lighting switch of the multifunction switch.
(Refer to Multifunction Switch)
|
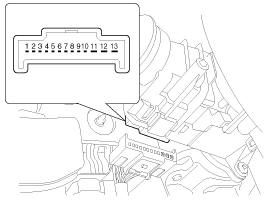
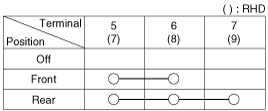
| 3. |
With the front fog lamp switch, make sure that continuity exists between
the terminals below.
If continuity is not as specified, replace the multi-function switch.
Fog Lamp
|
| Removal |
| 1. |
Disconnect the negative (-) battery terminal.
|
| 2. |
Remove the rear bumper cover.
(Refer to Body - "Rear Bumper Cover")
|
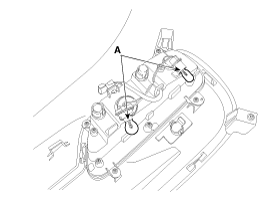
| 3. |
Disconnect the rear bumper main connector (A).
|
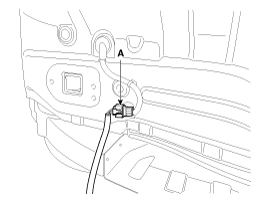
| 4. |
Disconnect the rear fog lamp connector (A) and ultrasonic sensor connector
(B).
Separate the wiring harness fixed clip (A) from the rear fog lamp assembly.
|


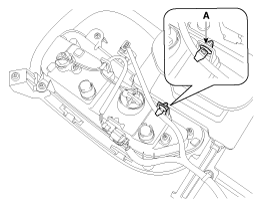
| 5. |
Remove the bulb (A) after turning it counterclockwise.
|
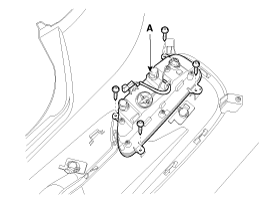
| 6. |
Remove the rear fog lamp assembly (A) after loosening the mounting screws.
|
| Installation |
| 1. |
Install the rear fog assembly and connect the connector.
|
| 2. |
Install the rear bumper cover.
|
 Front Fog Lamps Repair procedures
Inspection
1.
Disconnect the negative (-) battery terminal.
2.
Remove the lighting switch of the multifunction switch.
(Refer t ...
 High Mounted stop lamp Repair procedures
Removal
1.
Disconnect the negative (-) battery terminal.
2.
Remove the rear spoiler assembly (A).
(Refer to Body - "Rear S ...
Other information:
: What Is the Tire Sealant and Inflator Kit. Tire Sealant and Inflator Kit Precautions. Locating the Tire Sealant and Inflator Kit
What Is the Tire Sealant and Inflator Kit
The kit consists of an air compressor to
re-inflate the tire and a canister of sealing
compound that will effectively seal most
punctures. This kit will provide a temporary
tire repair allowing you to drive your vehicle
up to 120 mi (200 km) at a maximu ...
Kia Cee'd JD Service Manual: Specifications
Specifications
Content
Value
AFLS
Nominal voltage
DC 13.5V
Max voltage
DC 18.5V
Operating voltage
DC 9.5 ~ 16.5V
Operating temperature ...
