Kia Cee'd: Panoramaroof / Panoramaroof Assembly Repair procedures
| Replacement |
| 1. |
Remove the roof trim.
(Refer to Roof Trim - "Roof Trim Assembly")
|
| 2. |
Remove the roof antenna.
|
| 3. |
Remove the movable glass.
(Refer to Panoramaroof - "Movable Glass")
|
| 4. |
Remove the panoramaroof deflector.
(Refer to Panoramaroof - "Panoramaroof Deflector")
|
| 5. |
Remove the roof garnish.
(Refer to Body Side Molding - "Roof Garnish")
|
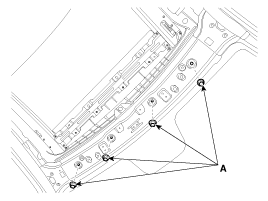
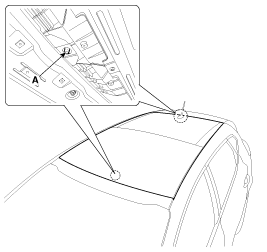
| 6. |
Loosen the panoramaroof mounting nuts (A).
[Front]
[Rear]
|
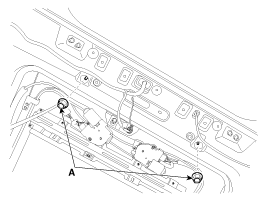
| 7. |
Loosen the panoramaroof side mounting bolts (A).
|
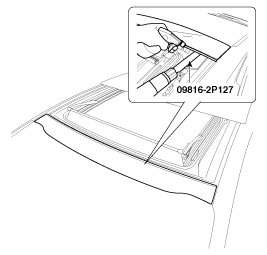
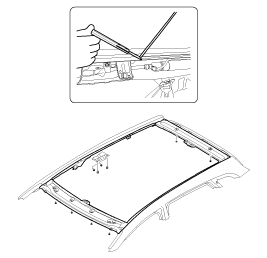
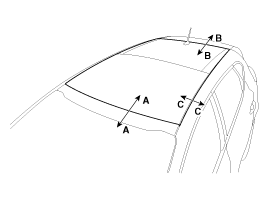
| 8. |
Open the space between chassis and front glass using flathead screwdriver,
and then cut the sealant of rear and side using a tool (09816-2P127).
|

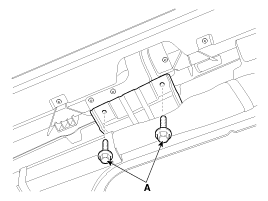
| 9. |
Remove the front glass (A).
|
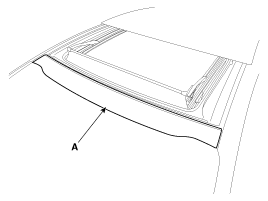
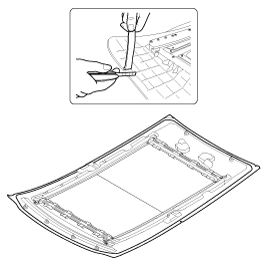
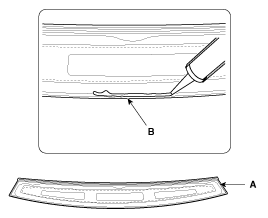
| 10. |
Open the space between chassis and sunroof using flathead screwdriver,
and then cut the sealant of front using a tool (09816-2P121, 09816-2P122).
|

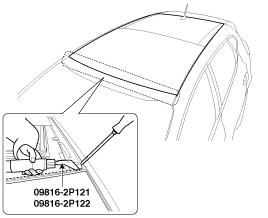
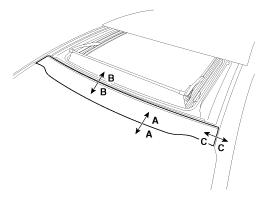
| 11. |
Open the space between chassis and sunroof using flathead screwdriver,
and then cut the sealant of aside using a tool (09816-2P121, 09816-2P122).
|
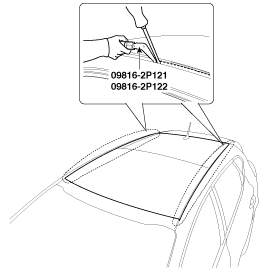
| 12. |
Open the space between chassis and sunroof using flathead screwdriver,
and then cut the sealant of rear using a tool (09816-2P121, 09816-2P122).
|

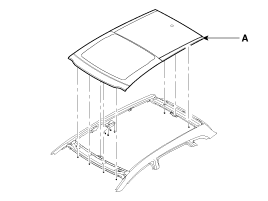
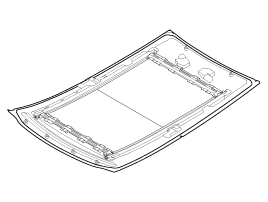
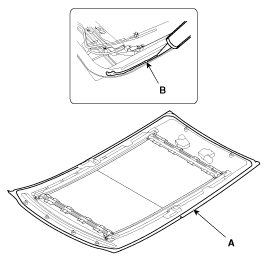
| 13. |
Cut the tape between the panoramaroof and the body. remove the panoramaroof
(A).
|
| 1. |
\With a knife, scrape the old adhesive smooth to a thickness of about
2mm (0.08 in.) on the bonding surface around the entire panoramaroof
opening flange.
|
| 2. |
Clean the body bonding surface with a sponge dampened in alcohol. After
cleaning, keep oil, grease and water from getting on the clean surface.
|
| 3. |
With a sponge, apply a light coat of body primer to the original adhesive
remaining around the windshield opening flange. Let the body primer
dry for at least 10 minutes :
|

| 4. |
Apply a light coat of glass primer to the outside of the fasteners.
|
| 5. |
Pack adhesive into the cartridge without air pockets to ensure continuous
delivery. Put the cartridge in a caulking gun, and run a bead of sealant
(B) around the edge of the panoramaroof (A) as shown. Apply the adhesive
within 30 minutes after applying the glass primer. Make a slightly thicker
bead at each corner.
|
| 6. |
Fix the panoramaroof to center hall (A) of body, carefully install the
panoramaroof to the body frame.
|
| 7. |
Check the Clearance and gap for each side after installing the panoramaroof.
|
||||||||||||||||||||||
| 8. |
Install the nuts (A) to the panoramaroof.
[Front]
[Rear]
|
| 9. |
Install the bolts (A).
|
| 10. |
Install the movable glass.
|
| 11. |
Open the movable glass fully.
|
| 12. |
Pack adhesive into the cartridge without air pockets to ensure continuous
delivery. Put the cartridge in a caulking gun, and run a bead of sealant
(B) around the edge of the front glass (A) as shown. Apply the adhesive
within 30 minutes after applying the glass primer. Make a slightly thicker
bead at each corner.
|
| 13. |
Install the front glass (A).
|
| 14. |
Install the roof garnish.
|
| 15. |
Install the panoramaroof deflector.
|
| 16. |
Close the movable glass fully.
|
| 17. |
Check the Clearance and gap for each side after installing the front
glass (A).
|
||||||||||||||||||||||
| 18. |
Install the roof antenna.
|
| 19. |
Scrape or wipe the excess adhesive off with a putty knife or towel.
To remove adhesive from a painted surface or the windshield, wipe with
a soft shop towel dampened with alcohol.
|
| 20. |
Let the adhesive dry for at least one hour, then spray water over the
roof and check for leaks. If a leak occurs, let it dry, then seal with
sealant :
|
| 21. |
Reinstall all remaining removed parts. Install the rearview mirror after
the adhesive has dried thoroughly. Advise the customer not to do the
following things for two the three days :
|
| 22. |
Install the roof trim.
|
 Panoramaroof Assembly Components and components location
Component Location
1. Panoramaroof assembly
...
 Mirror
...
Other information:
Kia Cee'd JD Service Manual: Repair procedures
Removal
1.
Remove the transaxle assembly.
G 1.6 MPI (Refer to Manual Transaxle System - " Manual Transaxle")
G 1.4 MPI (Refer to Manual Transaxle System - " Manual Transaxle")
D 1.6 TCI-U2 (Refer to Manual Transaxl ...
Kia Cee'd JD Service Manual: PTC Heater (Diesel Engine) Description and operation
Descriptionddd
The PTC (Positive Temperature Coefficient) heater is installed at the exit or
the backside of the heater core.
The PTC heater is an electric heater using a PTC element as an auxiliary heating
device that supplements deficiency of interior heat source in high ...
