Kia Cee'd: Blower / Intake Actuator Repair procedures
Kia Cee'd JD Service Manual / Heating,Ventilation, Air Conditioning / Blower / Intake Actuator Repair procedures
| Inspection |
| 1. |
Turn the ignition switch OFF.
|
| 2. |
Disconnect the intake actuator connector.
|
| 3. |
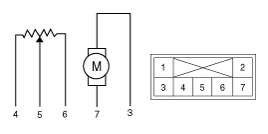
Verify that the intake actuator operates to the fresh position when
connecting 12V to terminal 4 and grounding terminal 3.
Verify that the intake actuator operates to the recirculation position
when connecing in reverse.
|
| 4. |
Connect the intake actuator connector.
|
| 5. |
Turn the ignition switch ON.
|
| 6. |
Check the voltage between terminal 6 and 5.
Specification
|
| 7. |
If the intake actuator does not operate well, substitute with a known-good
intake actuator and check for proper operation.
|
| 8. |
If the problem is corrected, replace the intake actuator.
|
| Replacement |
| 1. |
Disconnect the negative (-) battery terminal.
|
| 2. |
Remove the main crash pad assembly.
(Refer to Body - "Main Crash Pad Assembly")
|
| 3. |
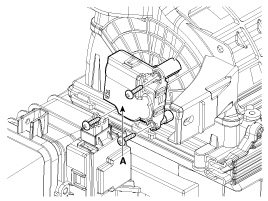
Disconnect the connector and then remove the intake actuator (A) after
loosening the mounting screws.
|
| 4. |
Install in the reverse order of removal.
|
 Intake Actuator Description and operation
Description
The intake actuator is located at the blower unit. It regulates the intake door
by the signal from control unit. Pressing the intake selection switch will shift
betwe ...
 Controller
...
Other information:
Kia Cee'd JD Service Manual: Rail Pressure Sensor (RPS) Repair procedures
Inspection
1.
Connect the GDS on the Data Link Connector (DLC).
2.
Measure the output voltage of the RPS at idle and various engine speed.
Condition
Output Voltage (V)
...
Kia Cee'd JD Service Manual: Specifications
Specifications
Item
Specifications
Working voltage
DC
12V
Operating force
14.7 ôÝ 2.9N
(1.5 ôÝ 0.3kg, 3.3 ôÝ 0.7lb)
Working temperature
-40ô¯C ~ 80ô ...
ôˋ 2017-2026 www.kceed.com


