Kia Cee'd: Front Suspension System / Front Strut Assembly Repair procedures
| Replacement |
| 1. |
Loosen the wheel nuts slightly.
Raise the vehicle, and make sure it is securely supported.
|
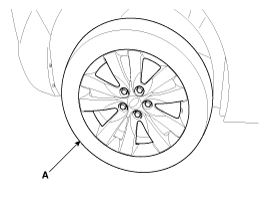
| 2. |
Remove the front wheel and tire (A) from front hub.
|

| 3. |
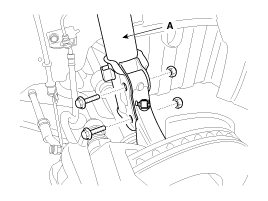
Remove the wheel speed sensor (A) bracket from the front strut assembly
by loosening the mounting bolts (B).
|
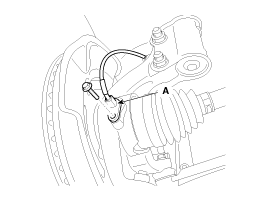

| 4. |
Disconnect the stabilizer link (B) from the front strut assembly (A)
after loosening the nut.
|

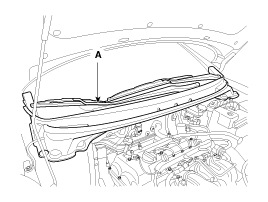
| 5. |
Remove the cowl top cover (A).
(Refer to Brake System - "Front Disc Brake")
|
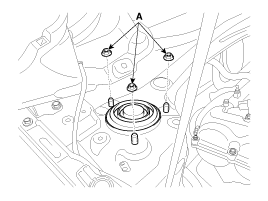
| 6. |
Remove the front strut assembly and then loosen the strut mounting nuts
(A).
|
| 7. |
Disconnect the front strut assembly (A) from the knuckle by loosening
the bolt & nut.
|
| 8. |
Install in the reverse order of removal.
|
| Disassembly |
| 1. |
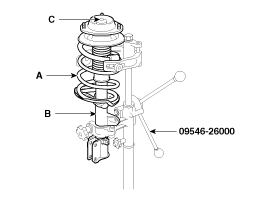
Using the special tool (09546-26000), compress the coil spring (A).
|
| 2. |
Remove the self-locking nut (C) from the strut assembly (B).
|
| 3. |
Remove the insulator, spring seat, coil spring and dust cover from the
strut assembly.
|
| 4. |
Reassembly is the reverse of the disassembly.
|
| Inspection |
| 1. |
Check the strut bearing for wear and damage.
|
| 2. |
Check the spring upper and lower seat for damage and deterioration.
|
| 3. |
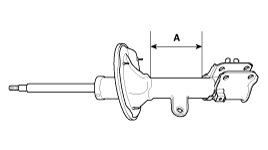
Compress and extend the piston rod (A) and check that there is no abnormal
resistance or unusual sound during operation.
|

| 1. |
Fully extend the piston rod.
|
| 2. |
Drill a hole on the (A) section to remove gas from the cylinder.
|
 Front Strut Assembly Components and components location
Components
1. Strut assembly
2. Insulator
3. Strut bearing
4. Spring upper pad
5. Coil spring
6. Dust cover
7. Spring lower pad
...
 Front Lower Arm Repair procedures
Replacement
1.
Loosen the wheel nuts slightly.
Raise the vehicle, and make sure it is securely supported.
2.
Remove the front w ...
Other information:
Kia Cee'd JD Owners Manual: Fuel filter warning light
(Diesel engine)
This warning light illuminates for 3 seconds
after the ignition switch is set to the
ON position and then it will go out. If it
lights up while the engine is running, it
indicates that water has accumulated
inside the fuel filter. If this happens,
remove the water from the fuel filter. ...
: Operating the Doors From Outside Your Vehicle
Unlocking and Locking the Doors Using the Remote Control
You can only use the remote control when
your vehicle is stationary.
Unlocking the Doors
Press the button to unlock all
doors.
Locking the Doors
Press the button to lock all
doors. One short flash of the
turn signal lamps confirms that
...
