Kia Cee'd: Automatic climate control system / Auto defogging system (Only for automatic climate control system)
Auto defogging reduces the possibility of fogging up the inside of the windshield by automatically sensing the moisture of inside the windshield.
The auto defogging system operates when the climate control system is on.
✽ NOTICE
The auto defogging system may not operate normally, when the outside temperture is below -15 °C.

This indicator illuminates when the auto defogging system senses the moisture of inside the windshield and operates.
If more moisture is in the vehicle, higher steps operate as follow.
Step 1 : Operating the air conditioning
Step 2 : Outside air position
Step 3 : Blowing air flow toward the windshield
Step 4 : Increasing air flow toward the
windshield
If your vehicle is equipped with the auto defogging system, it is automatically activated when the conditions are met. However, if you would like to cancel the auto defogging system, press the front defroster button 4 times within 2 seconds while pressing the AUTO button. The indicator will blink 3 times to notify you that the system is cancelled. To use the auto defogging system again, follow the procedures mentioned above.
If the battery has been disconnected or discharged, it resets to the auto defogging status.
✽ NOTICE
If the A/C off is manually selected while the auto defogging system is on, the auto defogging indicator will blink 3 times to give notice that the A/C off can not be selected.
CAUTION
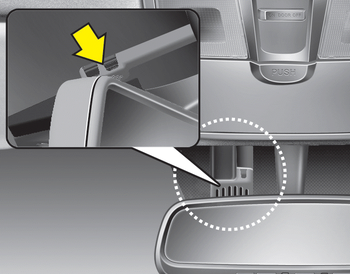
Do not remove the sensor cover located on the upper end of the driver side windshield glass. Damage to the system parts could occur and may not be covered by your vehicle warranty.
 To defrost outside windshield
1. Set the fan speed to the highest position.
2. Set the temperature to the hottest
(HIGH) position.
3. Press the button.
4. The air conditioning will turn on
according to the detected ambie ...
 Clean air
When the ignition switch is in the ON
position, the clean air function turns on
automatically.
Also, the clean air function turns off automatically,
when the ignition switch turns
to the OF ...
Other information:
Kia Cee'd JD Service Manual: Components and components location
Components
1. LDWS ON/OFF switch
2. Instrument cluster
3. LDWS unit
...
Kia Cee'd JD Service Manual: Components and components location
Components Location
1. Engine Control Module (ECM)
2. Manifold Absolute Pressure Sensor (MAPS)
3. Intake Air Temperature Sensor (IATS)
4. Engine Coolant Temperature Sensor (ECTS)
5. Throttle Position Sensor (TPS) [integrated into ETC Module]
6 ...
