Kia Cee'd: Troubleshooting / Ambient Temperature Sensor Repair procedures
Kia Cee'd JD Service Manual / Heating,Ventilation, Air Conditioning / Troubleshooting / Ambient Temperature Sensor Repair procedures
| Inspection |
| 1. |
Turn the ignition switch OFF.
|
| 2. |
Disconnect the ambient temperature sensor.
|
| 3. |
Check the resistance of the ambient temperature sensor between terminal
“+” and “-” whether it is changed by changing of the ambient temperature.
Specification
|
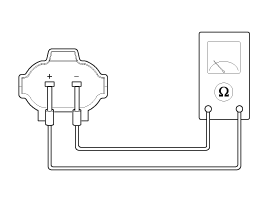
| 4. |
If the measured resistance is not within specification, substitute with
a known-good ambient temperature sensor and check for proper operation.
|
| 5. |
If the problem is corrected, replace the ambient temperature sensor.
|
| Replacement |
| 1. |
Disconnect the negative (-) battery terminal.
|
| 2. |
Remove the front bumper cover.
(Refer to Body - "Front Bumper Cover")
|
| 3. |
Disconnect the ambient temperature sensor connector (A).
|
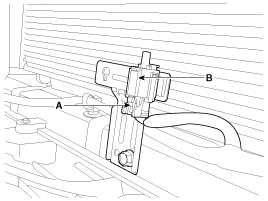
| 4. |
Remove the ambient temperature sensor (B).
|
| 5. |
Install in the reverse order of removal.
|
 Ambient Temperature Sensor Description and operation
Description
The ambient temperature sensor is located at the front of the condenser and
detects ambient air temperature. It is a negative type thermistor; resistance
will increas ...
 Auto Defogging Sensor Description and operation
Description
The auto defogging sensor is installed on the front window glass. The sensor
judges and sends signal if moisture occurs to blow out wind for defogging. The
air condit ...
Other information:
Kia Cee'd JD Service Manual: Back-up Lamp Switch Specifications
Specifications
Item
Specified
Type
ON/OFF
Operation condition
Reverse gear
Operation voltage
10V ~ 15V
Operation temperatures
-30°C ...
Kia Cee'd JD Service Manual: Components and components location
Component Location
1. EMS box assembly
2. Cooling fan(Low) relay
3. Cooling fan(High) relay
4. ESS relay
5. Blower relay
6. Rear defogger relay
7. HAC relay
8. SSB4(IG2) relay
9. Front wiper relay
10. SSB3(IG1) relay
...
© 2017-2026 www.kceed.com
