Kia Cee'd: Tail Gate / Tail Gate Trim Repair procedures
Kia Cee'd JD Service Manual / Body (Interior and Exterior) / Tail Gate / Tail Gate Trim Repair procedures
| Replacement |
|

[Tail gate trim]
| 1. |
After loosening the mounting screws, then remove the tail gate trim
(A).
|
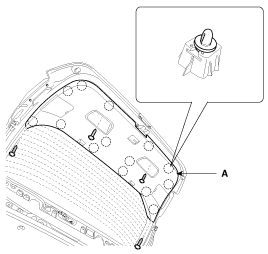
| 2. |
Install in the reverse order of removal.
|

[Tail gate upper trim]
| 1. |
Using a screwdriver or remover, remove the tail gate upper trim (A).
|
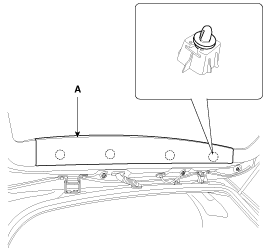
| 2. |
Install in the reverse order of removal.
|
[Tail gate side trim]
| 1. |
Remove the tail gate trim.
|
| 2. |
Remove the tail gate upper trim.
|
| 3. |
After loosening the mounting screws, then remove the tail gate side
trim (A).
|
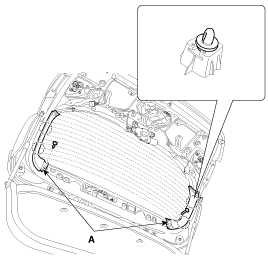
| 4. |
Install in the reverse order of removal.
|
 Tail Gate Trim Components and components location
Component Location
1. Tail gate trim
...
 Tail Gate Latch Components and components location
Component Location
1. Tail gate latch assembly
...
Other information:
Kia Cee'd JD Service Manual: Components and components location
Components (1)
[5Door]
1. Front bumper cover
Components (2)
[5Door]
1. Front bumper side bracket
[LH]
2. Front bumper side bracket [RH]
3. Front bumper upper bracket [LH]
...
Kia Cee'd JD Service Manual: Rear Seat Belt Buckle Repair procedures
Replacement
1.
Remove the rear seat cushion assembly.
(Refer to Rear Seat - "Rear Seat Assembly")
2.
Disconnect the rear seat belt buckle connector (B).
3.
Loosen the mounting bolt, and ...
© 2017-2026 www.kceed.com
