Kia Cee'd: Smart Key System / Smart Key Unit Repair procedures
| Inspection |
| – |
Refer to Smart key system - "Smart key Diagnostic"
|
| – |
Refer to Smart key system - "Smart key Diagnostic"
|
| – |
Refer to Smart key system - "Smart key Diagnostic"
|
| 1. |
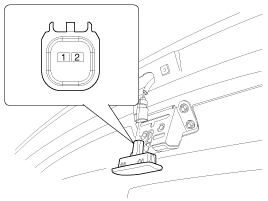
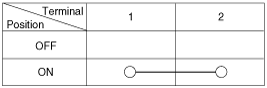
Check for continuity between the trunk/tailgate lid open switch terminals.
|
| 2. |
If continuity is not specified, inspect the switch
|
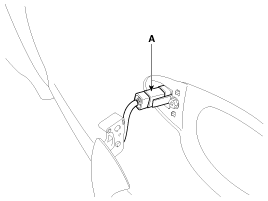
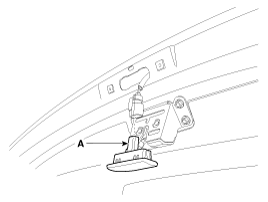
| Removal |
| 1. |
Disconnect the negative (-) battery terminal.
|
| 2. |
Remove the glove box housing.
(Refer to Body - "Glove Box Housing")
|
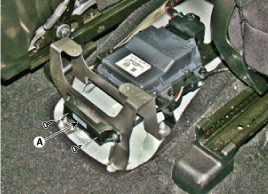
| 3. |
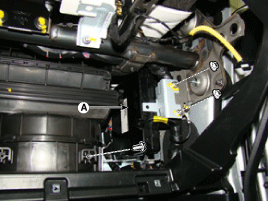
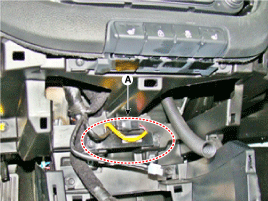
Remove the smart key unit (A) with loosening nuts and screw, then disconnect
the connector.
|
Take care not to scratch the crash pad and related parts.
|

| 1. |
Disconnect the negative (-) battery terminal.
|
| 2. |
Remove the crash pad center lower panel.
(Refer to Body - "Main Crash Pad Assembly")
|
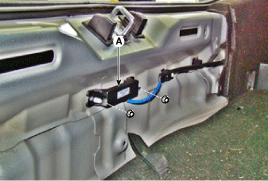
| 3. |
Disconnect the connector, then remove the interior #1 antenna (A) after
loosening 2 screws.
|
Take care not to scratch the crash pad and related parts.
|
| 1. |
Disconnect the negative (-) battery terminal.
|
| 2. |
Remove the floor console assembly.
(Refer to Body - "Floor Console Assembly")
|
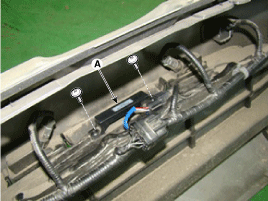
| 3. |
Disconnect the connector, then remove the interior #2 antenna (A) with
loosening 2 screws.
|
| 1. |
Disconnect the negative (-) battery terminal.
|
| 2. |
Remove the rear transverse trim.
(Refer to Body - "Rear Transverse Trim")
|
| 3. |
Disconnect the connector, then remove the trunk/tailgate antenna (A)
with loosening 2 nuts.
|
| 1. |
Disconnect the negative (-) battery terminal.
|
| 2. |
Remove the rear bumper beam assembly.
(Refer to Body - "Rear Bumper Beam Assembly")
|
| 3. |
Disconnect the connector, then remove the rear bumper antenna (A) with
loosening 2 screws.
|
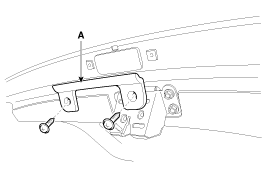
| 1. |
Disconnect the negative (-) battery terminal.
|
| 2. |
Remove the front left head lamp.
(Refer to Lighting System - "Head Lamps")
|
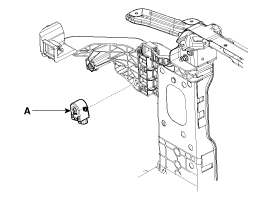
| 3. |
Remove the buzzer (A) after disconnecting the connector.
|
| 1. |
Disconnect the negative (-) battery terminal.
|
| 2. |
Loosen the mounting bolt after removing the holl pulg (B).
|
| 3. |
Remove the front door outside hand cover (A).
|
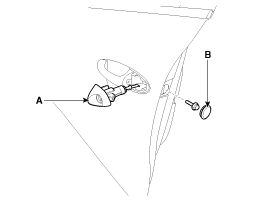
| 4. |
Remove the front door outside handle (A) by sliding it rearward.
|
| 5. |
Disconnect the front door outside handle connector (A).
|
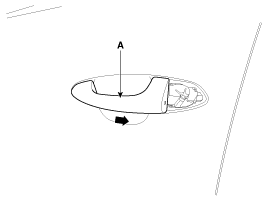
| 1. |
Disconnect the negative (-) battery terminal.
|
| 2. |
Remove the guide panel (A) after loosening the screws.
|
| 3. |
Disconnect the tailgate open switch connector (A) after loosening the
screws.
|
| Installation |
| 1. |
Install the smart key unit.
|
| 2. |
Connect the connector and install the smart key unit.
|
| 3. |
Install the glove box housing.
|
| 4. |
Install the negative (-) battery terminal and check the smart key system.
|
| 1. |
Install the interior #1 antenna.
|
| 2. |
Install the crash pad center lower panel.
|
| 3. |
Install the negative (-) battery terminal and check the smart key system.
|
| 1. |
Install the interior #2 antenna.
|
| 2. |
Install the floor console assembly.
|
| 3. |
Install the negative (-) battery terminal and check the smart key system.
|
| 1. |
Install the trunk/tailgate antenna.
|
| 2. |
Install the rear transverse trim.
|
| 3. |
Install the negative (-) battery terminal and check the smart key system.
|
| 1. |
Install the exterior bumper antenna.
|
| 2. |
Install the rear bumper beam and bumper.
|
| 3. |
Install the negative (-) battery terminal and check the smart key system.
|
| 1. |
Install the buzzer.
|
| 2. |
Install the front left head lamp.
|
| 3. |
Install the negative (-) battery terminal and check the smart key system.
|
| 1. |
Install the door outside handle.
|
| 2. |
Install the door trim.
|
| 3. |
Install the negative (-) battery terminal and check the smart key system.
|
| 1. |
Install the tailgate open switch.
|
| 2. |
Install the guide panel.
|
| 3. |
Install the negative (-) battery terminal and check the smart key system.
|
 Smart Key Unit Schematic diagrams
Circuit Diagram
...

Other information:
: Switching Driver Alert On and Off. Driver Alert Indicators
Switching Driver Alert On and Off
Press Settings on the touchscreen.
Press Driver Assistance.
Switch Driver Alert on or off.
Note: The system remains on or off
depending on how it was last set.
Resetting Driver Alert
You can reset the system by either:
Switching the ignition off and on.
Sto ...
Kia Cee'd JD Owners Manual: Inner panel fuse replacement
1. Turn the ignition switch and all other
switches off.
2. Open the fuse panel cover.
3. Pull the suspected fuse straight out.
Use the removal tool provided in the
engine compartment fuse panel.
4. Check the removed fuse; replace it if it
is blown.
5. Push in a new fuse of the same r ...
