Kia Cee'd: Keyless Entry and Burglar Alarm / Repair procedures
Kia Cee'd JD Service Manual / Body Electrical System / Keyless Entry and Burglar Alarm / Repair procedures
| Inspection |
Front Door Lock Module Inspection
| 1. |
Remove the front door trim.
(Refer to Body - "Front Door Trim")
|
| 2. |
Remove the front door module.
(Refer to Body - "Front Door Module")
|
| 3. |
Disconnect the connector from the actuator.
|

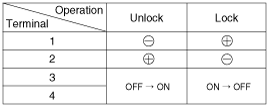
| 4. |
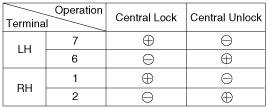
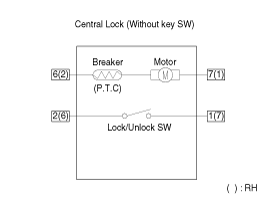
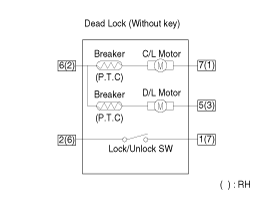
Check actuator operation by connecting power and ground according to
the table. To prevent damage to the actuator, apply battery voltage
only momentarily.
[Central Lock]
[Dead Lock]
|
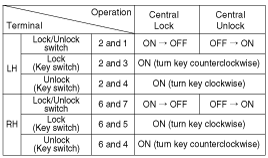
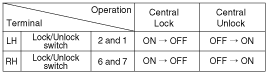
| 5. |
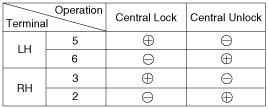
Check for continuity between the terminals in each switch position according
to the table.
[Central Lock]
|
Rear Door Lock Module Inspection
| 1. |
Remove the rear door trim.
(Refer to Body - "Rear Door Trim")
|
| 2. |
Remove the rear door module.
(Refer to Body - "Rear Door Module")
|
| 3. |
Disconnect the connector from the actuator.
|
| 4. |
Check actuator operation by connecting power and ground according to
the table. To prevent damage to the actuator, apply battery voltage
only momentarily.
[Central Lock]
[Dead Lock]
|
| 5. |
Check for continuity between the terminals in each switch position according
to the table.
[Central / Dead Lock]
|
Tailgate Release Module Inspection
| 1. |
Remove the tailgate trim.
(Refer to Body - "Tailgate Trim")
|
| 2. |
Disconnect the connector from the actuator.
|
| 3. |
Check actuator operation by connecting power and ground according to
the table. To prevent damage to the actuator, apply battery voltage
only momentarily.
|
Tailgate Open Switch Inspection
| 1. |
Remove the tailgate open switch bracket (A) after loosening screws.
|
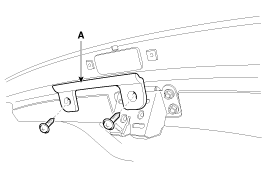
| 2. |
Remove the switch and disconnect the connector from the switch.
|

| 3. |
Check for continuity between the terminals in each switch position according
to the table.
|

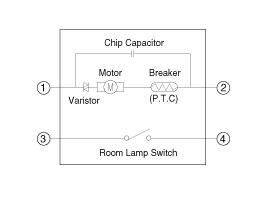
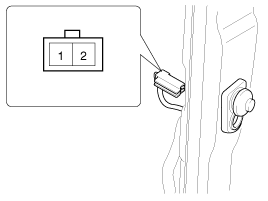
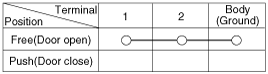
Door Switch Inspection
Remove the door switch and check for continuity between the terminals.
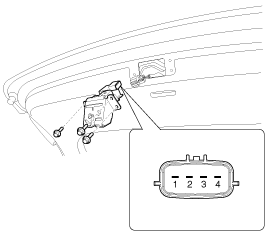
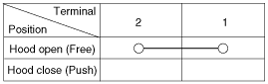
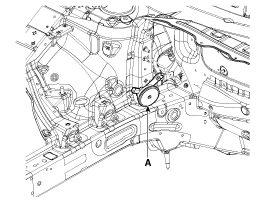
Hood Switch Inspection
| 1. |
Disconnect the connector from the hood switch (A).
|
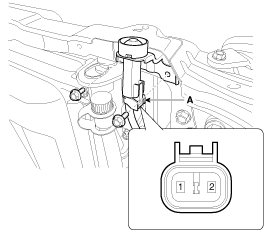
| 2. |
Check for continuity between the terminals and ground according to the
table.
|
Burglar Horn Inspection
| 1. |
Remove the burglar horn (A) after removing 1 bolt and disconnect the
connector from the burglar horn.
|
| 2. |
Test the burglar horn by connecting battery power to the terminal 1
and ground the terminal 2.
|
| 3. |
The burglar horn should make a sound. If the burglar horn fails to make
a sound replace it.
|
 Description and operation
Description
Burglar Alarm State [B/A State]
B/A State
Description
DISARM
1)
In "DISARM ...
 Transmitter Specifications
Specification
Item
Description
Power source
3V
Operating temperature
-20°C ~ +60°C (-4°F ~ ...
Other information:
Kia Cee'd JD Service Manual: Fuel Pressure Control Valve Specifications
Specification
Item
Specification
Coil Resistance (Ω)
0.5 [20°C(68°F)
...
Kia Cee'd JD Service Manual: High Pressure Fuel Pump Repair procedures
Removal
In case of removing the high pressure fuel pump, high pressure fuel
pipe, delivery pipe, and injector, there may be injury caused by leakage
of the high pressure fuel. So don’t do any repair w ...
© 2017-2026 www.kceed.com
