Kia Cee'd: Heater / PTC Heater (Diesel Engine) Description and operation
Kia Cee'd JD Service Manual / Heating,Ventilation, Air Conditioning / Heater / PTC Heater (Diesel Engine) Description and operation
| Descriptionddd |
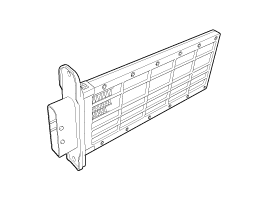
The PTC (Positive Temperature Coefficient) heater is installed at the exit or
the backside of the heater core.
The PTC heater is an electric heater using a PTC element as an auxiliary heating
device that supplements deficiency of interior heat source in highly effective
diesel engine. The electric heater heats up the interior by directly heating
the air that passes through the heater. The name itself implies that the element
has a proportional resistance change sensitive to temperature.
Operation Principle
ECM outputs a PTC ON signal and operates PTC relay 1. Then heater controller
operates PTC relay 2 and PTC relay 3 with an interval of 15 seconds.
However, PTC relay 3 can be operated while battery voltage is above 12.4V.
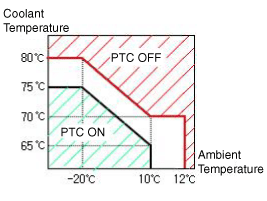
Operating Condition
PTC heater operates according to the following conditions :
| • |
Battery voltage : 12.4V or above
|
| • |
Engine : Running
|
| • |
Ambient temperature and coolant temperature
|
|
Ambient Temperature |
Coolant Temperature |
PTC Operation |
|
Below -20°C (-4°F) |
Below 75°C (167°F) |
ON |
|
10°C (50°F) |
Below 65°C (149°F) |
ON |
|
12°C (53.6°F) or above |
- |
OFF |
|
- |
80°C (176°F) or above |
OFF |
 Mode Control Actuator Repair procedures
Inspection
1.
Turn the ignition switch OFF.
2.
Disconnect the mode control actuator connector.
3.
Verify ...
 PTC Heater (Diesel Engine) Repair procedures
Inspection
Operating Logic Test (Manual only)
Inspect the PTC operation with the confirmation logic below :
1.
Entering
(1)
...
Other information:
: General Information
SYNC is an in-vehicle communications
system that works with your Bluetooth
enabled cellular phone and portable media
player. This allows you to:
Make and receive calls.
Access and play music from your
portable music player.
Use 911 Assist or Emergency Assistance
and applications via SYNC ...
Kia Cee'd JD Service Manual: Luggage Side Trim Components and components location
Component Location
[5Door]
1. Luggage side trim
[3Door]
1. Luggage side trim
...
© 2017-2026 www.kceed.com
