Kia Cee'd: Driveshaft Assembly / Dynamic Damper Repair procedures
Kia Cee'd JD Service Manual / Driveshaft and axle / Driveshaft Assembly / Dynamic Damper Repair procedures
| Replacement |
| 1. |
Remove the front driveshaft.
(Refer to Driveshaft Assembly - “Front Driveshaft”)
|
| 2. |
Remove the TJ joint assembly.
(Refer to Driveshaft Assembly - “TJ Joint”)
|
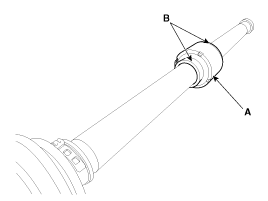
| 3. |
Remove the remove the both side of band (B) of the dynamic damper (A).
|
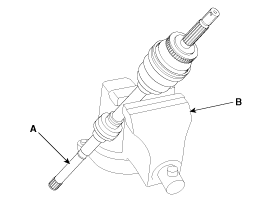
| 4. |
Fix the driveshaft (A) with a vice (B) as illustrated.
|
| 5. |
Apply soap powder on the shaft to prevent being damaged between the
shaft spline and the dynamic damper when the dynamic damper is removed.
|
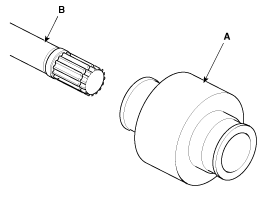
| 6. |
Seperate the dynamic damper (A) from the shaft (B) carefully.
|
| Installation |
| 1. |
Apply soap powder on the shaft to prevent being damaged between the
shaft spline and the dynamic damper.
|
| 2. |
Install the dynamic damper.
|
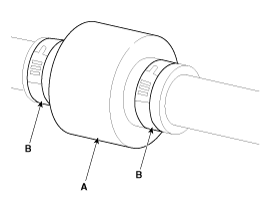
| 3. |
Install the dynamic damper band (A).
|
| 4. |
Using the SST(09495-3K000), secure the TJ boot bands (B).
|
| 5. |
Install the TJ joint assembly.
(Refer to Driveshaft Assembly - “TJ joint”)
|
| 6. |
Install the front driveshaft.
(Refer to Driveshaft Assembly - “Front Driveshaft”)
|
 Dynamic Damper Components and components location
Components
1. BJ
assembly
2. BJ circlip
3. BJ boot band
4. BJ boot
5. Dynamic
damper band
6. Dynamic damper
7. Shaft
8. TJ boo ...
 BJ Boot Components and components location
Components
1. BJ
assembly
2. BJ circlip
3. BJ boot band
4. BJ boot
5. Dynamic
damper band
6. Dynamic damper
7. Shaft
8. TJ boo ...
Other information:
: Drive Belt Routing Overview - 1.5L EcoBoost™ and 2.0L EcoBoost™
1.5L EcoBoost™
2.0L EcoBoost™
The long drive belt is on the first
pulley groove closest to the
engine.
The short drive belt is on the
second pulley groove farthest
from engine.
...
: Steering
Electric Power Steering
Electric Power Steering Precautions
WARNING: The electric power
steering system has diagnostic checks
that continuously monitor the system. If
a fault is detected, a message displays
in the information display. Stop your
vehicle as soon as it is safe to do so.
Switch th ...
© 2017-2026 www.kceed.com
